

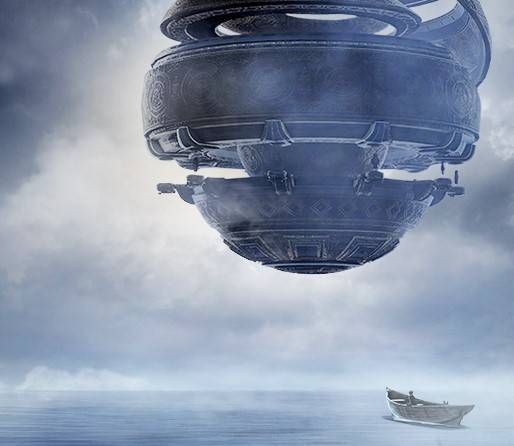
Magnus is a solo zone with hidden “Abyssal Veins” that you unlock via questing. Each time you discover an Abyssal Vein, you unlock rewards like fast travel and remote city storage.
Magnus Requirements:
- Main quest line completion up to about level 50 to 56. (Details below)
- You are given Magnus-exclusive equipment, so gear level is not required.
Magnus contains unique puzzles to solve.
Magnus Reward Highlights:
- Choose 1 PEN (V) defense gear that’s bound to family.
- Fast Travel from region to region, requiring 5m silver.
- 1 new class-specific Magnus Skill for most classes.
- Remote Storage access from any City Storage, Storage Container placed in your residence, and Pearl Shop Storage Maid.
- Use of the “Auto-move to All” inventory function that transfers any stackable item in your inventory to any city storage that already has that item stacked.
- Other goodies rewarded via a Black Spirit quest after each region is completed.
- +2 Max Energy from completing Knowledge categories.

Magnus Questline
Magnus has a questline of about 105 quests.
You can view your progress by pressing O → Main → [Abyss One] The Magnus
Magnus Questline Start: [The Magnus] Nostalgic for Velia
Quest Giver: Black Spirit (,)

Begin Magnus Questline:
Black Spirit (,) → Main Quest → [The Magnus] Nostalgic for Velia

Magnus Quest Line Requirements
The requirements for starting the Magnus questline were designed to be easy.
Basically, you have to complete the main quest line up to about when you turn level 50 to 56.
| Main Quest Start | Magnus Quest Requirement |
|---|---|
| Balenos | ◆ Complete Calpheon Main Questline |
| Simplified Main Questline (Season veteran) |
◆ Available from Lv. 50+ |
| Land of the Morning Light | ◆ Complete Land of the Morning Light Main Questline ◆ Complete Succession/Awakening (Talent, Ascension) |
| Everfrost | ◆ Complete the Everfrost Main Questline ◆ Complete Succession/Awakening (Talent, Ascension) |
Magnus Exclusions
You cannot enter Abyss One: The Magnus for the following situations:
- In a party/platoon
- In a duel
- While equipping a non-class weapon (i.e. matchlock, fishing rod)
- With trading goods in possession
- Less than 0 Karma
- In Fugitive state
- With Forced PvP (Alt+C) activated
- With a Trial Character
Magnus Questline Walkthrough
Black Spirit will have you chat with Eileen, <General Goods Vendor> located in Velia.
You will then travel to Bartali Farm and have to jump into a water well.
Jumping into the water well teleports you into the Magnus.

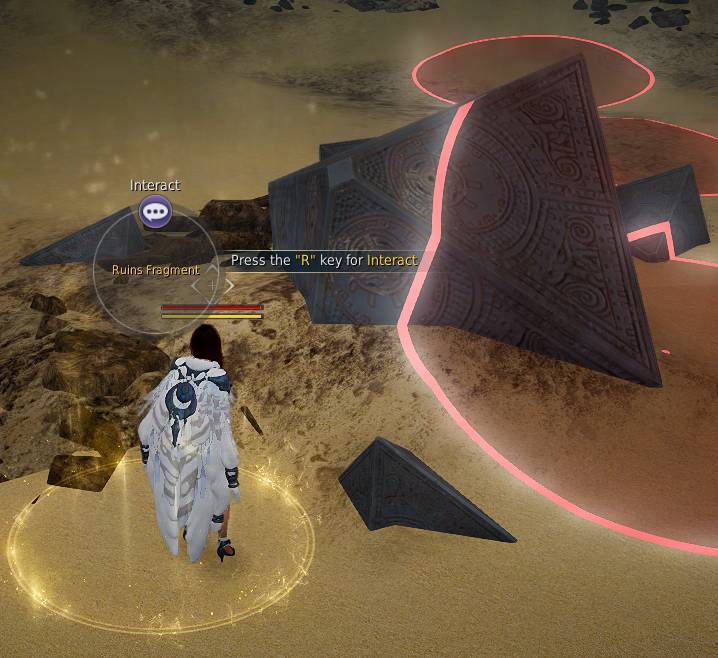
[The Magnus] Where Are We? Investigate the unidentified structure.
→ Interact with the glowing Abyssal Altar.

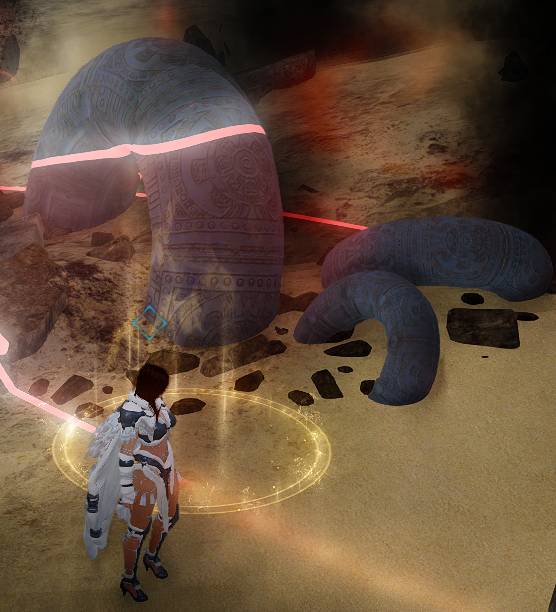
[The Magnus] Stone Chamber Relic?
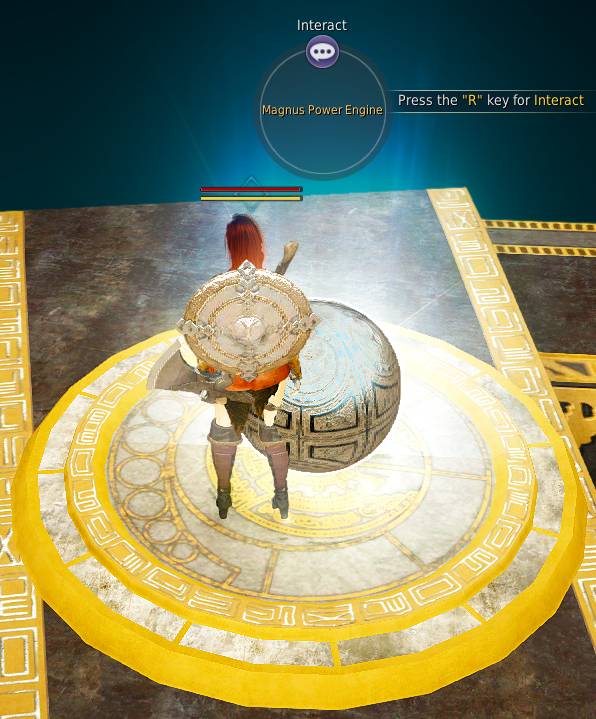
Quest Text: Climb the stairway and investigate the unidentified sphere.
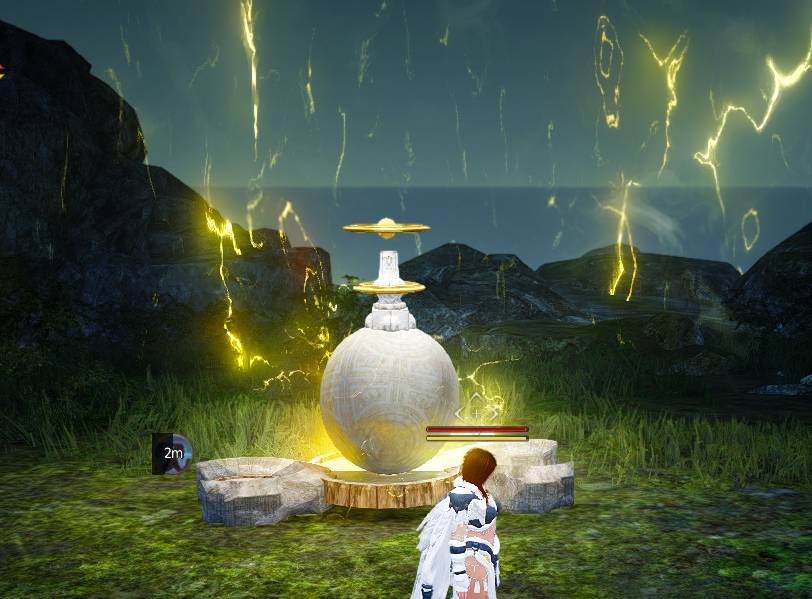
You will find a glowing orb called “Magnus Power Engine”.
Magnus Gear
Be sure to equip all your Magnus gear when you can. This gear can only be worn in the Magnus.
Press I key to open your inventory and right click each piece to equip the set.
Magnus: Abyss One Gear:
- AP: 243
- DP: 323

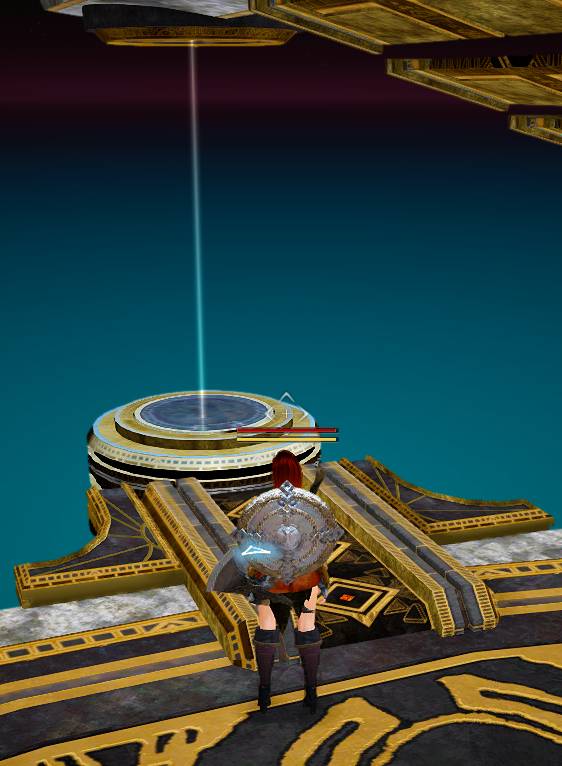
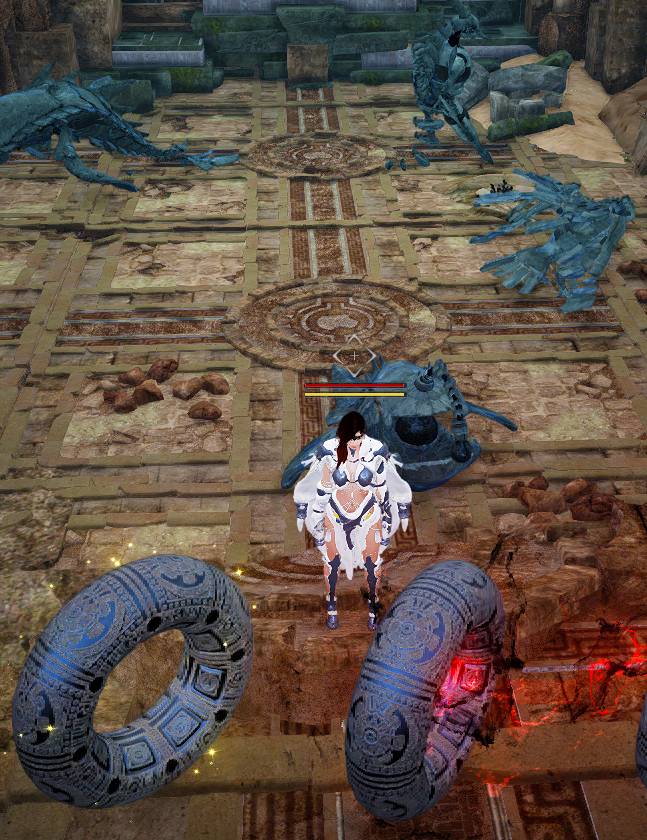
[The Magnus] Below
Quest Text: Head down the stairway and look around the lower floor
Look for a beam of light illuminating a round platform.
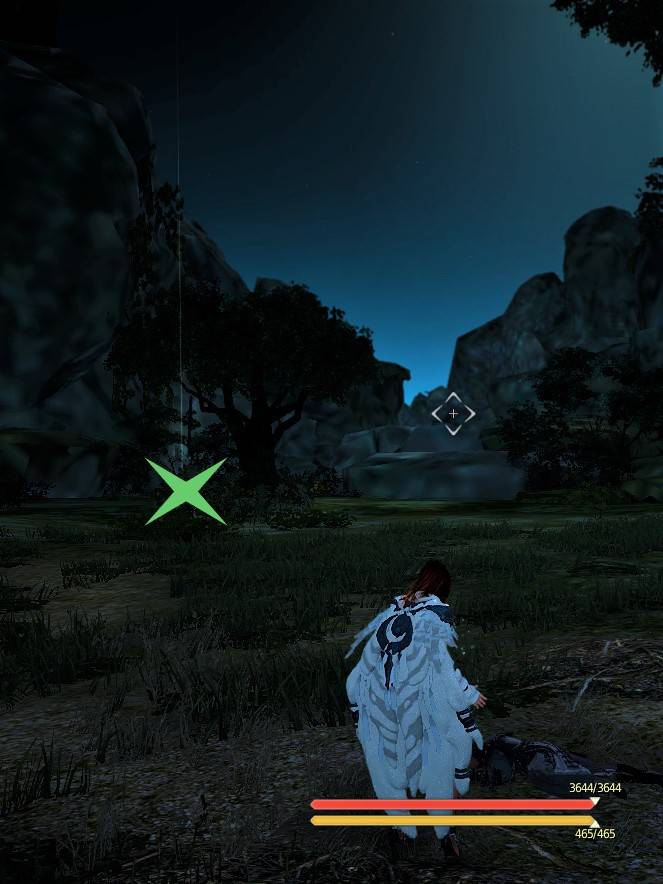
Interact with invisible object, “Abyssal Vein”
[The Magnus] Center of the Abyss
Quest text: Investigate the center of the abyss
Go back to where you first arrived inside Magnus. Interact with invisible object, “Center of the Abyss”

[The Magnus] Peaceful Vagabond
You will be dumped into the abyss and must board a rowboat with a cat on it.
Press SPACE to climb into the boat then R key.
Follow the glowing white clouds, rowing through them. If the cloud splits into two, the cat will “Meow” at you when you are heading in the right direction.
The final cloud has a beam of light shooting up into the sky. Dismount the boat by pressing R key then interact with the “Abyssal Afterimage”.
You will be teleported to a nearby floating ‘ship’. Step into the center and you will be teleported back to the Magnus. Talk with Wuju who is next to you to continue with the questline.

Sad Red-nosed Imp
Quest Name: [The Magnus] Why Don’t You Do It Yourself?
Quest Objective: Pick up and carry 3 Abyssal Pearls, 1 at a time, and set them on the altar.
The pearls are hidden throughout the cave. Find them on shelves near the walls. Avoid the troll seeing you or the puzzle will fail. Hug the wall after picking up the pearl and wait for the right time to take the pearl to the altar.
When all 3 are on the altar, a black cat will spawn indicating that you completed the puzzle successfully. Follow it back to the portal device. Talk to the cat then step into the portal that takes you back to the magnus.

Teleporting Back to the Magnus
At the end of each puzzle during the Magnus questline, a Black Cat will appear when you have successfully completed the puzzle.
Speak to the Black Cat who will port you onto the ‘ship’ teleporter that takes you back to the Magnus.
Note: Sometimes the Black Spirit will appear at this point to grant you knowledge.

Pendulum Goes Tick-tock
Quest Text: Resolve the Pendulum Goes Tick-tock anomaly.
Objective: Carry the Abyssal Pearl to the column of light at the opposite end while avoiding the bouncing blue orbs.
Careful of the smaller blue orb that travels randomly!
If you are caught, you will have to start all over again.
After dropping the Abyssal Pearl down at the other end, the black cat will spawn. Talk with it and hitch a ride on the spaceship back to the Magnus.

[The Magnus] Steps of the Abyss
Quest text: Go through the abyssal veins in the lower levels of the Magnus to find Wuju.
Speak to Wuju, who is down some stairs.
[The Magnus] By Mountain’s Breeze
Quest text: Move to Serendia through the abyssal veins.
Use the teleporter behind Wuju to travel to Eastern Border node, which is east of Heidel.
This will open up remote storage for Balenos and Serendia Territory.
Speak to the Mysterious Traveler nearby for rewards, then head to Moretti Farm to examine the next anomaly.

The Mysterious Traveler & the Next Anomaly
At the end of each anomaly investigation, you will be ported back to the real world to investigate the anomaly in a new zone.
Speak to the Black Spirit for knowledge on the new zone. This opens up Magnus well travel to that zone and remote storage access to any storage keepers in that zone that you’ve previously spoken to.
Speak to the Black Spirit to accept a quest to talk to the Mysterious Traveler nearby. She rewards you with different goodies before proceeding in the questline to solve the anomaly for the next zone.

[The Magnus] To Moretti Farm!
Quest text: Examine the anomaly at Serendia’s Moretti Farm.
At Moretti Farm, climb the ladder outside the empty building to the top of the roof and interact with a glowy cloud.
Speak to Black Spirit to pick up the next quest, then jump into the water well and speak to Wuju.

Golden Lion of Serendia
Quest Name: [The Magnus] Strange, but Familiar
The square stone platform under the beam of light opens the gate ahead when you stand on it.
Chat with Jordine a few times and wait for him to stand on the platform. After he does, run ahead and stand on the square platform before the floor of fire. This keeps the gate open permanently.
Go back into the previous room and interract with the “Mystical Waterfall” in the small pool of water.
With the visible effects of the Mystical Waterfall’s buff on you, approach the fire carefully until it disappears. It will disappear in sections. Proceed slowly and wait for the fire to die out before moving again. If you run through too quickly, you will die.
Step on the square plate to open a closed gate. Run just inside the next room and wait for Jordine. Speak to him and allow him to lead you through the next room to safety. Don’t touch the black wisps floating in the air.

Golden Lion of Serendia #2
Pick up the Abyssal Pearl on the floor and place it on the square diagonally from Jordine (or 2nd Pearl). See pic.
This opens the gates to the room near Jordine.
Interact with “Small Container” object inside the room to get Ancient Orders. Place them on the wooden table called “First Altar.”
Interact with “Junk” object to get a Rusty Helmet.
Note: Interacting with “Old Crank” opens the gates if they close.
Now move the Pearls to the opposite diagonal corners to open the gates to the second room.
Place Rusty Helmet on the 3rd Altar.
Interact with “Sword and Shield” object to get a Rusty Quiver. Place Rusty Quiver on the 4th Altar.
Interact with “Strangely Patterned Flag” object to get a Old Flag.
Move the pearls again to open the first room. Place the “Old Flag” on the 2nd altar.
Summary of Item Placement on Altars:
- 1st Altar: Ancient Orders
- 2nd Altar: Old Flag
- 3rd Altar: Rusty Helmet
- 4th Altar: Rusty Quiver


Golden Lion of Serendia #3
Follow Jordine ahead down the corridor, defeating mobs along the way and destroying 3 gates.

Golden Lion of Serendia #4
At the end, you will fight Katzvariak.
When he paints the room with a different color, get behind a pillar to avoid his AOE attack.
Text on the screen will warn you ahead of time and let you know what to do.
After the monster is dead, speak to Jordine, then the cat to board the ship and go back to the magnus.
Exploding Fireworks
After portaling in, look to your right or left for the snake, Ibedor, and talk to him.
A discarded chariot (cannon) will spawn beside you. SPACE bar and then R to mount it.
- LMB: Fires cannon
- RMB: Rapid Fire
- W: raise angle
- S: lower angle
- Hold LMB: Extends Range
Protect the large gateway on the left side from being invaded by rock golems!
The rock golems will come out of two small circles and march toward the middle pointed structure then march back to the large purple circle gateway. Kill the golems before they destroy the gateway!
Aim your cannon fire at the pointy structure in the middle and LMB when the golems get near it. RMB to rapid fire when the circles are filled. Kill the golems before they head back to the gateway.
After the test is over, speak to the black cat and portal back to the Magnus.


To the Dragon Palace
Find and interract with only the spheres called “Spacetime Afterimage”. The balls called “Spatial Afterimage” will teleport you back to the beginning.
- 1st Spacetime Afterimage: only 1 available to start the puzzle
- 2nd Spacetime Afterimage: second to the last ball
- 3rd Spacetime Afterimage: only 1 available at the opposite end
- 4th Spacetime Afterimage: go right. second to the last ball
- 5th Spacetime Afterimage: on the left narrow walkway
- 6th Spacetime Afterimage: go left, 3rd closest ball
- 7th Spacetime Afterimage: the last ball at the end
The 7th Afterimage is more glowy than the other ones. Using it will teleport you to a tall narrow pedestal.
Jump down into the water below where you see rafts and a light in the middle.
Swim to the light and interact with the light called “Abyssal Afterimage”.
After being teleported out, go downstairs and speak to Wuju at the very bottom center of Magnus. You will be teleported to Falres Dirt Farm, SE of Calpheon.
Speak to Black Spirit and accept the Magnus quest. This unlocks remote storage for Calpheon territory.


Some Adventurer’s Grave
After traveling to Gabino Farm, interact with “Misplaced Alchemy Sack” in front of the water well.
Speak to Black Spirt and pick up next Magnus quest.
Jump down the well and go downstairs to speak to Wuju at the very bottom center of Magnus.
Go upstairs and interact with the glowing Abyssal Altar.
Interact with a square, “Some Adventurer’s Legacy” to start the puzzle.
Press Q key to crouch and move to the yellow beam of light.
Destroy the diamond shaped object at the end and pick up the Pearl.
Wait until the red circles disappear, then carry the Pearl to the next yellow beam of light. Drop the Pearl on the platform highlighted by the yellow beam of light.

Girl Who Lost the Sea
Interact with object “Bonfire”.
Interact with object “Flint.” (It is a large rock nearby with a slightly glowing corner.)
Interact with object “Bonfire” again.
Speak to Lara and keep chatting with her until you have the option to “Ask for the location of the tree.”
Follow the yellow ball of light over a small cliff and interact with the “Hard Tree” object below. If you fall off the edge at any time, you will be teleported safely back to Lara. The puzzle does not reset.
Chat with Lara again and select, “Ask for the location of the tree.”
Again, follow the ball of yellow light to a Hard Tree.
Chat with Lara and select, “Hand over Hard Tree x2”.
Chat with Lara until you can select, “Ask for the location of the materials”.
Again, follow the ball of yellow light to a “Tree Trunk” object.
Chat with Lara and select, “Ask for the location of the resin”.
Again, follow the ball of yellow light to a “Solidified Resin” object.
Interact with Bonfire and select, “Melt the hardened resin”.
After the raft is built, chat with Lara and follow her to the beach.
At the shore, chat with Lara again then board the raft.
NOTE: If the raft dumps you into the water, you may have to swim to the teleportation device far away from the island.
Speak with the Black Cat on the raft below the device.


Only Thing that Matters
Go towards the light and speak to Gorgath laying on the ground.
Run toward the thin beam of yellow light and gather Sunrise Herb. (Beside a tall tree.)
This light was hard to see, but if you look carefully, you can see it.
Run toward a different thin beam of yellow light to gather Evening Primrose.
Speak to Gorgath again and 8 Pillars will appear.
Turn each Pillar until their orbs are all facing foward in the same direction.
The orbs will show when they are in the correct position by becoming glowy and shimmery. (See the change immediately in the Interact window after using the Chat option 1 or more times.)
See image for an example glow. It’s quite faint and easy to miss, so watch carefully!
The Black Cat will appear when you are done.
After you are teleported to Magnus, go to the Abyssal Vein room downstairs.
Mediah and Ulukita Abyssal Vein knowledge and remote storage is rewarded.


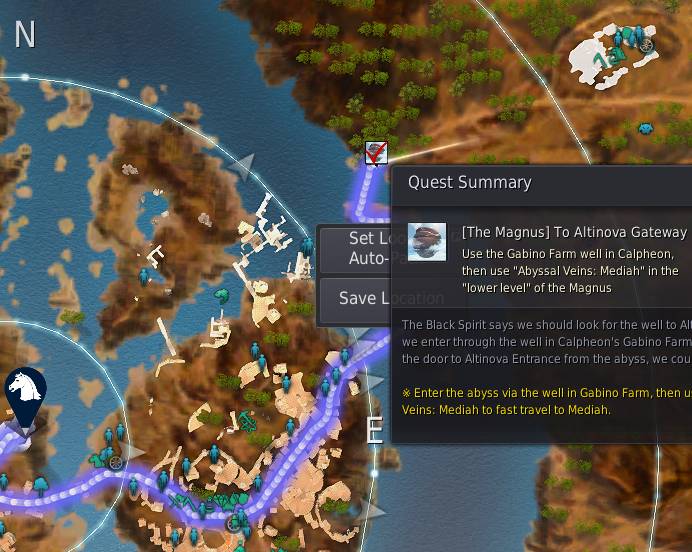
To the Altinova Gateway
Use the Abyssal Vein, which will teleport you just ouside Altinova.
Talk to Black Spirit and pick up the next Magnus quest.
Speak to Gorgoth. You will be teleported to Calpheon College.
After the cut scene, talk with Black Spirit. Run back to Gabino Farm, drop down the well, then take the Mediah Abyssal Vein which teleports you back to Stonebreak Shore near Altinova.
Head to the Altinova Gateway node which is NE of Altinova in Valencia territory.
Beneath the Surface
Interact with a glowy white cloud in front of the water well at the node Altinova Gateway, NE of Altinova.
Jump into the water well and talk to Wuju.
Speak to Zobadi then follow a dark dust cloud until a mole pops up out of the ground. If the mole isn’t Ferocious, move on to the next cloud. Find the Fercious mole and kill it.
Talk to Zobadi and then interact with the “Light Left By Someone” that spawns.
Portal back to the Magnus and interract with the singing altar. Right click the quest UI to find the right altar. Interract with it twice, talk to the Black Spirit, then head up the stairs to talk to Wuju.

Look Before You…
Speak to Yeonhwa several times.
Run up the long stairway to the top and interact with some text on the wall called “First Hint.”

Go back downstairs until you see the section of stairs where half of the stairs are missing. There is a unique looking lamp on the wall next to it.
Interact with the lamp object called “Beneath the lamp.”
Walk backward from the lamp off of the ledge and fall down to an invisible ledge below.

Interact with the wheel on the wall called, “Worn Device”.
Press LMB to “Crank Left”.
Drop down or climb up and go back to the top of the stairs where Yeonhwa is. Interact with the writing on the wall to complete the 1st hint and begin the 2nd hint.
2nd Hint
After speaking to Yeonhwa, 3 soldiers will spawn behind you. Kill each one. The one that looks like he drops the most gold coins (3 coins) is standing in front of the correct “Worn Device”. Press LMB to “Crank Left”.

3rd Hint
Run all the way to the top of the stairs and interact with “3rd Hint”.
A fighter called Belmorn will appear behind you on an invisible bridge.
Wait until you see two streaks of light race across the bridge then run to the where the fighter is and kill him. Fight in the small area where he stands, so that future light beams don’t touch you.
If the lights touch you, you will be sent back to the stairway.

4th Hint
Run all the way to the top of the stairs and interact with “Fourth Hint”.
A dog and a chicken will spawn on small glowing circles below.
Run downstairs to find and jump onto the circle with the chicken.
A platform will spawn. Walk onto each platform, after it spawns.
The final platform will take you to the Black Cat.
Stormy Hills
Interact with the sparkling device, “Cron’s Heart”.
A sparkling yellow wall encircles you and shrinks smaller and smaller around you.
Move so that you are always in the direct center of the circle.
A green circle will appear in the middle which is safe.
If you are ouside the green circle, you will have to start over.
After successfully completing the cycle 4-5 times, you win the game which spawns the Black Cat.

Struggle for Survival
You will arrive near a band of Cenaurs trying to destroy a well.
Fight them and more waves of monsters will come.
Finally defeat Kutum and Nouver.
Talk to the Black Cat, go back to the Magnus, and speak to Wuju.
After a cut scene, take the Kamasylvia Abyssal Vein which portals you to Lake Flondor. This unlocks remote storage for Kamasylvia.
Speak to the Black Spirit and the Mysterious Traveler at Lake Flondor before heading SW to the Grana Dirt Farm to find Eileen.
After speaking to Eileen and the Black Spirit, drop into the well and interact with the glowing Abyssal Altar in the Magnus to begin the Soar Like a Bird quest.

Soar Like A Bird
Talk to Baulo several times and answer him correctly:
- 1st Answer: Two eagles flew by
- 2nd Answer: Seagull
Finish listening and responding to Baulo’s story to finish the quest. Speak to the Black Cat and portal back to the Magnus.
Scarlet Thread
Interact with the ball “Thread of Fate” to begin the puzzle.
The puzzle spawns 3 NPCs with 3 spheres that are red, yellow, and blue. They will station themselves like Chess pieces.
The objective of the game is to draw a path from each NPC to its like-colored sphere without intersecting any other color paths.
How To:
- Pick up the Abyssal Pearl at each NPC and carry it to a matching color sphere to draw a path.
- Make sure the circular platforms you walk over light up to form a path. If you go, too fast the path will break.
- Drop the Pearl at its matching color Sphere.
- Complete this process with all 3 NPCs.
The puzzle turns white when you are successful. Finally, interact with the “Abyssal Rift” to spawn the Black Cat.


Peculiar Library
Speak to Momellies to begin.
Answer her questions correctly:
- Wind and Lightning
- If there’s no bread, then cake!
- Everlasting Glory of the Vedir, Ordore
If you accidentally select the wrong answer, hit ESC key then RETRY.
Speak to the Black Cat on the stairs and go back to the Magnus. After a cut scene, interact with the Drieghan Abyssal Vein and portal to Drieghan. Speak to the Black Spirit and the Mysterious Traveler. Drieghan remote storage is rewarded.
Head to the Marak Farm node to speak with Eileen, then use the well to portal back to the Magnus and speak to Wuju.

End of Tomorrow
Speak to Oberin then jump onto the wagon to pick up a Pearl.
Carry the Pearl to Jordine standing in a glowing circle in the distance.
Wait until Jordine disappears then carry it to the next circle.
Carefully observe the pattern and timing of the meteors that fall and avoid them.
The falling meteors repeat in a loop. If you don’t walk in the right path at the right time, you will have to start all over by speaking to Oberin and obtaining the Pearl from the wagon again.
Drop the Pearl in the circle around Oberin standing between two pillars and speak to him. The black cat will spawn so you can portal back to the Magnus.
Southward Travels
Speak to Yeonhwa on the other side of the large room, then interact with wheel on the left side of the doorway. LMB to “Crank Left” two times until the gate is open and follow Yeonhwa inside the puzzle room.
While Yeonhwa stations herself beside another doorway, take note of the two Braziers on each side of stairs with the symbols above them.
In the middle of the cavern is a large central brazier and surrounding it are 6-7 torches.
When you interact with each torch, a different symbol will materialize above the central brazier for a few seconds then disappear. One torch will not create a symbol at all.
Interact with the torches until you find the ones that create the 2 symbols you noted by the stairs and the torch that creates no symbol at all. These are the 3 torches you need to complete the puzzle. Interact with each torch until you’ve found and memorized their locations.
Interract with a torch that matched one of the braziers by the stairs, then interract with the brazier to light it. If you correctly matched the torch to the brazier, the brazier will light. Do the same for the other torch and brazier pair – first interact with the torch then the matching brazier by the stair. Verify that it too lights up.
After the braziers by the stairs are lit, locate the torch that did not have a symbol. Interract with that torch and light the large central brazier last. This will open the door to the next hallway.
Two Braziers by the Stairs.

Torch
Central Brazier
Southward Travels Part 2
Follow Yeonhwa through the artifact rooms until she stops at a locked door. While she keeps the place from falling apart with her strength of will alone, you are expected to solve the puzzle. It’s another matching symbol puzzle – just on a larger scale.
On the wall directly behind Yeonhwa, is the “home base” of the puzzle, called Ator’s Lungs. Here is where a large glowing symbol will appear that you have to match with the ruins artifact in one of the other rooms.
Memorize the first shape displayed inside Ator’s Lungs and find the room with the matching ruins artifact. Try to avoid the red rings, but don’t worry if you get hit a few times – it’s not a death sentence.
You will see a glowing yellow ring around the correct matching artifact. Quickly interact with it and run back to Ator’s Lungs to “turn it in”.
If you have matched the symbol from Ator’s Lungs to the correct artifact, the next symbol will appear. Repeat the above until all the symbols from Ator’s Lungs have been matched to the correct artifact.
You will have to do this four times for four different symbols – Sphere, Ring, Pyramid, and Octahedron. The Octahedron looks like two pyramids stuck together.
After all 4 shapes are placed correctly at the lung, follow Yeonhwa to the end room and speak to the Black Cat.
Southward Travels Room Layout
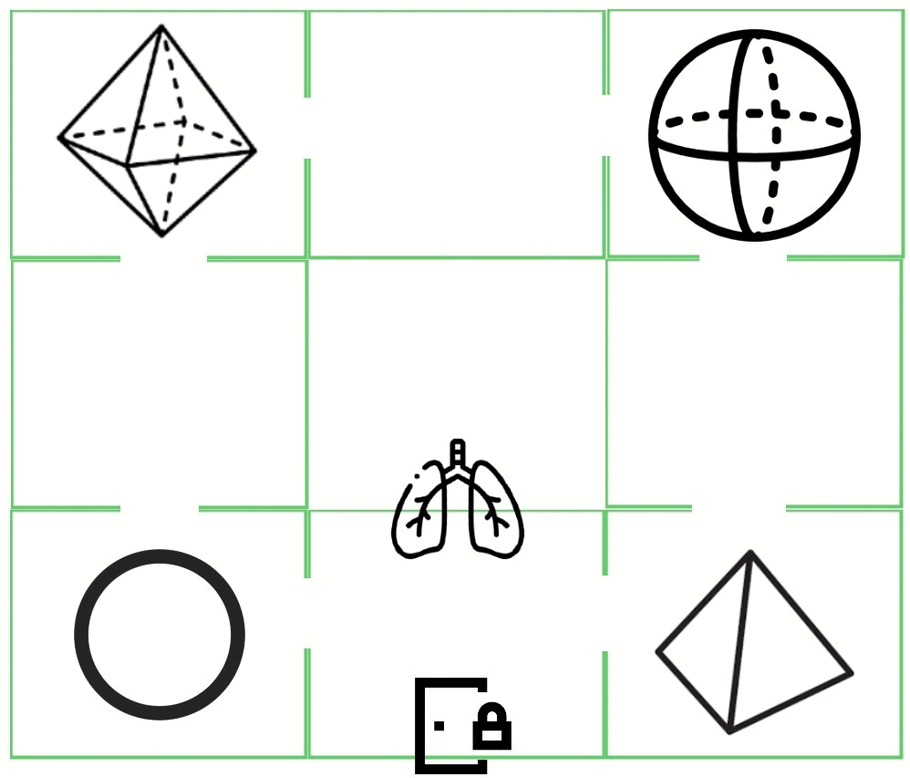
Octahedron Room
Pyramid Room

Ring Room
Sphere Room

Riddle of the Slumbering Sage
Ignore the row of floating stone rings on the raised dais when you enter. These just keep track of your puzzle progress.
Pay attention to the two ancient weapons (stone monsters) that spawn in the room below the dais. Feel free to get up close and personal with them. They don’t attack. Memorize them.
After the 2 disappear, then two more will spawn, 1 inside each circle on the ground. Stand inside the circle with the stone monster that did NOT spawn previously. He is the odd man out!
If you selected the right monster, you win the 1st round and the game proceeds to the 2nd round.
There are 3 total rounds. Each round adds 1 extra monster to memorize. Pick the odd man out each time to finish the puzzle.
Talk to the Black Cat and portal out to the Magnus. Talk to Black Spirit and the Mysterious Traveler at Salanar Pond.
This unlocks remote storage for O’dyllita.
Travel to Delmira Plantation and speak with Eileen. Use the well to go back to the Magnus and speak to Wuju and the Black Spirit.
The Third Laboratory
Speak with the Chimera to begin the experiment. Maintain the yellow bubble around Red Nose at mid-levels by hitting the appropriate Sealing Device (red or blue).
- Blue Sealing Device: enlarges the bubble (charge energy)
- Red Sealing Device: shrinks the bubble (release energy)
Follow the visual and textual clues to know when to attack the blue or red device.
After the experiment is over, interact with any of the sealing devices to spawn the Black Cat and portal back to the Magnus. Speak with Yeonhwa and Wuju to begin the next quest.

Where the Dragon Sleeps
Move ahead and speak with Leon. Have him light up the area.
The objective of this game is to reach the treasure chest behind the sleeping dragon without waking him up. Running into jars and skulls will wake him up.
Press Q key to crouch before you enter the dragon’s lair. Move while crouched. Do not stand or the dragon will wake!
Turn left as soon as you are able to, go around groups of jars and bones, under the dragon’s wing, to the treasure chest. Touching the dragon’s wings, feet, or tail while crouched will not wake him up.
Interact with the treasure chest located under the dragon’s tail, then talk to the Black Cat to portal back to the Magnus..

Light-bearing Pot
This game’s objective is simple and random. Destroy pots until you find the one that has a hidden light.
If you destroy more than 40 jars before finding the hidden light, the puzzle resets. The location of the light is random each reset.
Interact with the hidden light to spawn the Black Cat.
Speak with Wuju after portaling back to the Magnus, then take the Mountain of Eternal Winter Abyssal Vein.
When you arrive in MoEW, speak with the Black Spirit and the Mysterious Traveler. This unlocks remote storage for Mountain of Eternal Winter.
Head North to the well at Erethea’s Belt.

Into the Fire
The object of this game is to place 1 pearl on each of the 5 round platforms surrounding the fighter.
Approach the fighter to begin the game.
Dodge the red circles and race to the outer edges of the area to find a blue glowing pearl.
Pick up the pearl and carry it back to the fighter, placing 1 on each platform. Dodge any attacks he might make.
It’s okay to make mistakes as the hits take health but do not kill immediately.
Repeat 4 more times until all platforms have a pearl. Speak to the Black Cat to finish and go back to the Magnus.

Rhutums Strike Back
Speak to the Rhutum Wizard standing by the gate with the red circular seal, then follow him inside the fort and speak to him again. “Attempt to seal the evil sphere” will begin the game.
The object of the game is to allow 6 other Rhutum Wizards inside the Gateway to help the quest giver but kill the monsters that are disguised as Rhutums.
While the quest giver is busy at the evil sphere, guard the Gateway. Interact with the gateway to turn ON the blue neon seal when you see a group of 4-5 Rhutums spawn outside and walk towards you. These evil monsters are disguised as Rhutums and will be revealed by the blue neon seal as they pass through the gateway. Quickly kill the evil monsters before they reach the wizard.
After you kill the group of evil monsters, a group of 2 Rhutums will spawn outside the gate. They come in groups of 2, hold staffs, and look just like the quest NPC. Interact with the gateway to turn OFF the blue neon seal so the real wizards can pass through without being disintegrated.
Another group of fake Rhutums will spawn, then another group of 2 real Rhutums, back and forth. Keep killing the fake ones and allowing the real wizards to help your quest giver
When you have 6 Rhutum Wizards helping the quest giver, you win.
Speak to the Rhutum Wizard quest giver again to finish the game and spawn the Black Cat.

Dreaming Kamaslyve
Face Goyen with Wuju. Cutscenes cannot be skipped here, so enjoy or take a break 😛
Defeat Goyen after choosing the battle difficulty. Easy and Hard difficulty give the same rewards.
Goyen will heal himself and has several large AOE attacks you can dodge. After defeating Goyen, listen to his story.

The Magnus [Final Step]
Speak to Jordine then climb the tree and interract with the Black Cat. Take the portal back to the Magnus, speak to the NPCs and finish up the main Magnus questline.
The Magnus [Sounds Like a Cat]
After returning to Balenos, speak to the Black Spirit and the Mysterious Traveler to receive 120 Failstack, 500 Crons, and a 15 day Value Pack.
At this time you can also pick up the quest The Magnus [The Last Abyssal Vein] from the Black Spirit. This leads to the Land of Morning Light anomaly which was added to the Magnus questline after LoML release. It is not necessary to complete this to get your free PEN (V) boss armor and Abyssal Legacy class skill, but it does open well travel to LoML.
The Magnus [Wuju’s Gift…?]
Use the well at Bartali Farm node to go back to the Magnus and check on Wuju.
The Black Spirit will have you use the Balenos Abyssal Vein to find the chest Wuju spoke about.
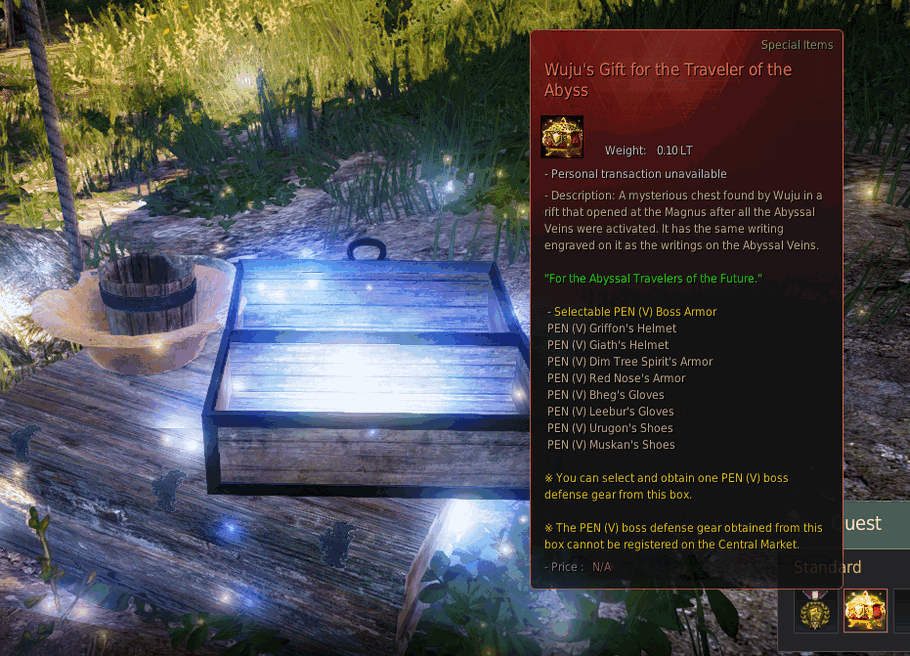
Free PEN (V) Boss Armor
Quest Name: [The Magnus] Chest from the Abyss
After arriving in Balenos, do not follow the auto navigation to find the chest. The chest is already near where you are dropped off at.
Head a few steps south to a chest that’s on the right side of the nearest cloth covered wooden stands.
Pass up the Spotless Treasure Chest and open the golden Unidentified Chest to receive Wuju’s Gift for Pen (V) Boss Gear.
Black Spirit will have you go back to the Magnus, talk to the Black Cat, then head to the Contaminated Farm in Calpheon to speak to Gorgath. Summon Black Spirit to finish the main questline and receive your Class Abyssal Legacy Skill. See below for more details on class Legacy Skills.

Magnus PEN Boss Armor
Unidentified Chest Location

Magnus PEN (V) Boss Gear
Choose 1 PEN (V) Boss Gear for completing the quest, “[The Magnus] Box from the Abyss.”
- Limited to once per Family.
- Can’t be registered on Central Market. *
- This gear is identical to Jetina’s Guaranteed PEN (V) boss gear.
- Optional Slumbering Origin Armor Upgrade:
- Gear can be upgraded after enhancing the Caphras level to 10.
- * Slumbering Origin Gear can be registered on the Central Market.
Slumbering Origin Armor Set
- Chest → Fallen God’s Armor
- Head → Labreska’s Helmet
- Hands → Dahn’s Gloves
- Feet → Ator’s Shoes
Helmet:
 PEN (V) Giath’s Helmet
 PEN (V) Griffon’s Helmet
Chest:
 PEN (V) Dim Tree Spirit’s Armor
 PEN (V) Red Nose’s Armor
Shoes:
 PEN (V) Urugon’s Shoes
 PEN (V) Muskan’s Shoes
Gloves:
 PEN (V) Leebur’s Gloves
 PEN (V) Bheg’s Gloves
Choosing the Best Jetina PEN Boss Gear
Boss Gear that provides more Damage Reduction, rather than Evasion is going to be the best choice for most players. Please see bdfoundry.com excellent guide on DR vs Evasion for details.
Top Rated Damage Reduction Jetina Boss Gear
| PEN Boss Gear | DP | Accuracy | Evasion | Damage Reduction | Item Effect |
|---|---|---|---|---|---|
| 89 | 0 | 40 (+120) | 49 (+24) | Max HP +200 Max MP/WP/SP +100 |
|
| 89 | 0 | 40 (+120) | 49 (+24) | Increase HP Recovery Max MP/WP/SP +100 |
|
| 79 | 0 | 43 (+45) | 36 (+41) | Movement Speed +1 | |
| 80 | 0 | 28 (+60) | 52 (+22) | All Resistance +5% | |
| 62 | 50 | 26 (+78) | 36 (+19) |
Compare All Jetina PEN Boss Defense Gear
Includes all possible choices, even those with evasion focus.
| PEN Boss Gear | DP | Accuracy | Evasion | Damage Reduction | Bonus Effect |
|---|---|---|---|---|---|
| 79 | 0 | 43 (+45) | 36 (+41) | Movement Speed +1 | |
| 79 | 0 | 45 (+90) | 34 (+14) | none | |
| 80 | 0 | 28 (+60) | 52 (+22) | All Resistance +5% | |
| 80 | 0 | 28 (+60) | 52 (+16) | Max HP +100 | |
| 62 | 50 | 26 (+78) | 36 (+19) | none | |
| 62 | 25 | 33 (+103) | 29 (+17) | none | |
| 89 | 0 | 40 (+120) | 49 (+24) | Max HP +200 Max MP/WP/SP +100 |
|
| 89 | 0 | 40 (+120) | 49 (+24) | Increase HP Recovery Max MP/WP/SP +100 |
Marketplace Prices for Boss DR Gear
Since Magnus PEN Boss gear is equivalent to what you can purchase on the marketplace, we can discover the cost and player demand.
Marketplace prices below are for NA.
Dim Tree Spirit’s Armor
Current price, stock, and daily sale rate of a Dim Tree Spirit’s Armor.
| Dim Tree Armor | Base Price | In Stock | Daily Volume |
|---|---|---|---|
| Base | 292,000,000 | 8 | 6 |
| PRI | 1,020,000,000 | 0 | 0 |
| DUO | 1,160,000,000 | 0 | 0 |
| TRI | 1,770,000,000 | 1 | 1 |
| TET | 2,170,000,000 | 1 | 2 |
| PEN | 12,500,000,000 | 0 | 1 |
Red Nose’s Armor
Current price, stock, and daily sale rate of Red Nose’s Armor.
| Red Nose's Armor | Base Price | In Stock | Daily Volume |
|---|---|---|---|
| Base | 299,000,000 | 15 | 6 |
| PRI | 1,020,000,000 | 0 | 0 |
| DUO | 1,040,000,000 | 0 | 0 |
| TRI | 1,770,000,000 | 0 | 4 |
| TET | 2,970,000,000 | 1 | 5 |
| PEN | 15,300,000,000 | 1 | 1 |
Griffon’s Helmet
Current price, stock, and daily sale rate of a Griffon’s Helmet.
| Griffon's Helmet | Base Price | In Stock | Daily Volume |
|---|---|---|---|
| Base | 275,000,000 | 35 | 9 |
| PRI | 1,020,000,000 | ||
| DUO | 1,170,000,000 | ||
| TRI | 1,770,000,000 | ||
| TET | 2,680,000,000 | 1 | |
| PEN | 13,800,000,000 | 1 |
Bheg’s Gloves
Current price, stock, and daily sale rate of Bheg’s Gloves.
| Bheg's Gloves | Base Price | In Stock | Daily Volume |
|---|---|---|---|
| Base | 275,000,000 | 17 | 8 |
| PRI | 1,020,000,000 | 0 | 1 |
| DUO | 1,170,000,000 | 0 | 0 |
| TRI | 1,770,000,000 | 0 | 1 |
| TET | 2,690,000,000 | 1 | 2 |
| PEN | 14,200,000,000 | 1 | 1 |
Urugon’s Shoes
Current price, stock, and daily sale rate of Urugon’s Shoes.
| Urugon’s Shoes | Base Price | In Stock | Daily Volume |
|---|---|---|---|
| Base | 297,000,000 | 47 | 9 |
| PRI | 1,080,000,000 | 0 | 1 |
| DUO | 1,250,000,000 | 0 | 0 |
| TRI | 1,930,000,000 | 1 | 5 |
| TET | 2,730,000,000 | 3 | 9 |
| PEN | 14,300,000,000 | 4 | 8 |
Magnus: Land of the Morning Light
You can now begin an additional Magnus questline that will allow transport and storage access in the new zone Land of the Morning Light.
Prerequisites:
1. Be Lvl 56+
2. Completed the Abyss One: The Magnus Main Questline – [The Magnus] Chest from the Abyss
Begin by talking to the Black Spirit and accepting the quest: [LoML] Yeonhwa’s Departure.
Speak several times to Yeonhwa who is located at the Velia docks.
After she boards the ship to Land of the Morning Light, accept the quest: [LoML] Snotface Wants To See You from the Black Spirit.
Enter the Magnus through a well and go up the stairs to speak to Wuju.


After speaking to chatty Wuju several times and completing quests: [The Magnus] Last Abyssal Vein and [The Magnus] Another Anomaly, Wuju will give you the quest [The Magnus] Memories of the Deep Sea to investigate the new Abyssal anomaly that suddenly opened up.
Head back down the stairs and interact with the Abyssal Altar to activate the Memories of the Deep Sea anomaly, then head down to the middle to enter the puzzle. Equip the special Abyss One Gear when the UI opens up.

[The Magnus] Memories of the Deep Sea
You’ll want to grab a pen and some paper to make a diagram of the order in which balls light up around the platform. Make a circle in the middle of the paper to represent the platform.
Approach the circular platform to begin the puzzle. Several metal balls will spawn around the circular platform. Move back a bit so you have a wider view of the area surrounding the platform.
Watch the order the beam of light hits the balls. Use the numbers 1-7 to represent the 7 balls and mark the numbers on your paper as the beam of light hits them in a circular pattern until all the balls have been recorded.
Starting with the first beamed ball that you marked on your paper, number 1, pick it up and carry it to the platform until it lights up and absorbs the ball. Do the same with ball #2, in order all the way through 7.
Grab the Damaged Record Device that spawns over the platform when you’ve completed the puzzle.
Speak to the Black Cat that appears and enter the portal that takes you back to the Magnus.
Hand in your quest to Wuju and gain [Knowledge] Memories of the Deep Sea.
Hand Wuju the Damaged Record Device and speak to him several more times. Head back downstairs and interact with the Abyssal Altar to activate the Unseen Shadow anomaly.


[The Magnus] Unseen Shadow
Interact with the Unidentified Device by the staircase to accept the quest and begin the timed anomaly. You have 2 minutes to get to the top of the tower and finish the quest by interacting with the Device at the top.
Sprint up the stairs until you reach the FIRST Unidentified Device. Interact with it to spawn a circular floating platform behind you. Gently walk onto the platform and ride it up several flights of stairs. Hop back onto the stairs when the platform stops going up.
Run up one more flight of stairs and interract with the FIRST Unidentified Device you see to spawn another circular floating platform behind you. Ride that platform up several flights of stairs. Hop back onto the stairs when the platform stops going up.
Sprint up the rest of the stairs to the top and interact with the final Unidentified Device in front of the double doors. Talk to the cat and ride the transporter back to the Magnus to speak to Wuju.
If the timer runs out before you make it to the top just ESC and retry.
Hand in your quest to Wuju and gain [Knowledge] Unseen Shadow. Accept the quest to begin the 3rd puzzle. Head back downstairs and interact with the Abyssal Altar to activate the Netherworld Registry Institute anomaly.


[The Magnus] Netherworld Registry Institute
Speak to the Unknown Headmaster and accept the quest “Precious Register” to begin the puzzle. Interact with the correct 2 objects to complete.
Interact with a round white Luxurious Vase on the wooden floor beside a zig-zag patterned column. It’s on the NPC’s left hand side when you are facing the same direction as the NPC.
Next, interact with the Antiquated Box on the stone floor in the outer hallway. It’s by the right side of the entrance door, when you are facing the door. There is a long narrow white vase above it on the book shelf.
Give the register from the box to the Unknown Headmaster to complete the quest. Speak to the Black Cat to portal back to the Magnus. Speak to Black Spirit to accept the quest: [The Magnus] Morning’s Breeze.


Finishing Up The LoML Magnus
Note: When you portal back to the Magnus, do NOT speak to Wuju. If you do, he doesn’t have a quest to turn in. Instead, run down to the Abyssal Vein portal area and approach the LoML platform.
After a movie plays, take the platform to Nampo, speak to the Black Spirit, accept the quest [The Magnus: Special Gift], then speak to the Mysterious Traveler one more time for more goodies.

Magnus Knowledge Rewards
As you progress through the main Magnus questline, you’ll get knowledge which opens quests for more goodies.
- After obtaining an “Abyssal Veins” knowledge for each region, talk to Black Spirit (,) to obtain a quest.
- The quest requires you to speak to a Mysterious Traveler NPC to claim your rewards.
- Items are rewarded once per Family.
+2 Max Energy for Magnus Knowledge
You will gain a total of 2 Max Energy for completing the Magnus knowledge categories:
Press H key to view Magnus Knowledge:
- Adventure Journal → Abyss One: The Magnus Journal → Abyss Adventure Log I and Abyss Adventure Log II
After completing the main quest line, visit the following NPCs:
- Gorgath and Eileen: Calpheon City Library 1st floor near Kaia Feresio
- Yeonhwa: Velia on the northern dock near Criox the Wharf Manager
- Jordine: west of Southwestern Gateway (west of Glish) in the big ravine.
- Goyen: Kusha, Mediah inside the tallest white building up several stairways.
NOTE: Warriors have a slightly different questline that rewards additional Knowledge. (but not required for the Energy reward.)
Magnus Skills: Abyssal Legacy
A unique Magnus Skill is rewarded to each class for completing the main Magnus questline.
Quest Rewards:
 – [Secret Book] Abyssal Legacy – Use book to learn your Magnus Skill. It will replace the skill commands of one Absolute skill. You can still add and use the replaced Absolute skill via Quick Slot.
 – Armstrong’s Skill Guide (1 Day)
If you lose the secret book item, you can get another one by talking to Cruhorn Wyrmsbane.
After using the book, find your Abyssal Legacy Skill by looking in the Main tab of your Skills UI (K).
Magnus Skill Questline:
-
 – [The Magnus] Box from the Abyss
 - – [The Magnus] Abyssal Legacy
- – [The Magnus] Revelations
- – [The Magnus] Abyssal Revelation (60+)
- [The Magnus] Abyssal Revelation” quest is available once per character.
Quest Giver: Black Spirit
Requirement: level 60+
Magnus Remote Storage Access
Magnus allows you to access almost all city storages from any other city storage. (Not available in Muiquun.)
How To Use: vist any Storage Keeper NPC
Requirements: Magnus main questline
Remote Access to Other Regions’ Storage


- Item Exclusions: trade items, exchange items, treasure items, Ornette’s Spirit Essence, Odore’s Spirit Essence, and basic potion items.
Magnus Teleport Map
Abyssal Wells are magical water wells located near major cities that allow you to travel from region to region almost instantly.
- Jumping into an Abyssal Well teleports you into The Magnus, in which you can travel to distant regions for silver.
- To travel to a specific region, you have to unlock the corresponding Abyssal Vein (teleport) located inside The Magnus.
- Abyssal Veins (teleports) are unlocked by completing that region’s Magnus questline.
- After completing the Magnus questline, you can bypass the Magnus and interact with an Abyssal Well to open a teleport map.

Bypass the Magnus to Teleport:
- After finishing all Magnus quests, you unlock Abyssal Wells for teleporting to other areas.
- Simply interact with an Abyssal Well to open a map and choose where you want to go.
- Once you’ve picked a destination, it gets marked on the map and the glowing orb over the well changes into an icon representing the territory you selected.

Jump the Activated Well!
- Use SPACE to jump onto the Abyssal Well, then drop inside to teleport.
- You can’t pick your current location as a destination.

Deactivated Abyssal Well
Interact to open a teleportation map.

Activated Abyssal Well
Jump inside to teleport!

Abyssal Well Locations and Cost
- View Abyssal Well locations you have obtained on the World Map (M).
- 5,000,000 silver is charged regardless of the distance.
| Territory Icon | Abyssal Well Location | Arrival Point |
|---|---|---|
 Balenos |
Bartali Farm Balenos |
Loggia Farm Balenos |
 Serendia |
Moretti Plantation Serendia |
Eastern Border Serendia |
 Calpheon |
Gabino Farm Calpheon |
Falres Dirt Farm Calpheon |
 Mediah |
Altinova Gateway Mediah |
Stonebeak Shore Mediah |
 Valencia |
Erdal Farm Valencia |
Fohalam Farm Valencia |
 Kamasylvia |
NW Grána farm Kamasylvia |
Lake Flondor Kamasylvia |
 Drieghan |
Marak Farm Drieghan |
Duvencrune Farmland Drieghan |
O’dyllita |
Delmira Plantation O’dyllita |
Salanar Pond O’dyllita |
 Everfrost |
Erethea’s Belt Everfrost |
Zvier Highlands Everfrost |
 Land of Morning Light |
Nampo’s Moodle Village LoML |
Nampo’s Moodle Village LoML |
 Ulukita |
SW of Muzgar Ulukita |
West of Muzgar Ulukita |
Oquilla’s Eye |
Oquilla’s Eye Ocean Island |
Oquilla’s Eye Ocean Island |
- Territory Arrival Points:
- Bartali Farm in Balenos
- Eastern Border in Serendia
- Falres Dirt Farm in Calpheon
- Stonebeak Shore in Mediah
- Fohalam Farm in Valencia
- Lake Flondor in Kamasylvia
- Duvencrune Farmland in Drieghan
- Salanar Pond in O’dyllita
- Zvier Highlands in Everfrost
- Nampo’s Moodle Village in LoML
- West of Muzgar in Ulukita
- Oquilla’s Eye an island north of Lema Island
Magnus Abyssal Well Locations
Use the “Find NPCs” function located to the left of the minimap to search for the location of Abyssal Wells once you have obtain the corresponding Knowledge from completing the Magnus questline.
Click the Abyssal Well button icon to navigate to the Abyssal Well nearest to your location.
You can also click on an Abyssal Well icon on the World Map (M) to draw an autopath to it.

Abyssal Vein Knowledge & Icons
The teleporters inside the Magnus are called Abyssal Veins, but you can bypass these once you obtain the correct Abyssal Vein Knowledge.
Obtain each Knowledge by talking to the Abyssal Veins in Oquilla’s Eye during the Magnus main questline.
Magnus Titles
The Magnus main questline rewards the following titles:
- Young and Reckless
- Dunce
- Snot-faced Wuju
- Monster
- Singularity
- Eileen’s BFF
- Anomaly Normalizer
- Copycat
- One of a Kind
- Got the Chills
- Dimensions Apart
- Exhausted
- More Bark than Bite
- Abyssal Traveler
- Well, Well, Well
- The Greatsword’s Master (Warriors can obtain a special title by proceeding with the main questline)
Sources & Additional Info
Official Pages:
PA news release: https://www.naeu.playblackdesert.com/en-US/News/Detail?groupContentNo=3880.
Patch Notes: https://www.naeu.playblackdesert.com/en-US/News/Detail?groupContentNo=4106
GM Notes: https://www.naeu.playblackdesert.com/en-US/News/Detail?groupContentNo=4126
Magnus Quests/Puzzles Removed in Patch
A Roudy Crowd
UPDATE: from Patch Notes 7-19-23:
- An accident has occurred where some parts of the abyss sank down too deep. Thanks to the energy gathered from solving many errors, the Abyssal Veins is in perfect order.
- Below are the parts lost to the depths.
- A Rowdy Crowd
- Captivating Cruise
- Due to their disappearance, related Magnus quests had their completion conditions adjusted.
- Below are the parts lost to the depths.
Guide before patch
A Roudy Crowd
Interact with the Wagon and select, “Look for the Rope and Raw Sugar.”
Press the I key and select the Bag Tab. Right click the capturing rope to equip it.
Horse Taming:
- Slowly approach horse. If you get too close, the horse will spook and you’ll have to start over.
- Line up your cross hairs with the horse until it turns red.
- Press LMB
- If you are successful, the first minigame will appear. Press space when the bar is in the blue. (Very similar to the fishing mini-game)
- Approach the horse until you see the horse rear up and a SPACE button icon appears.
- Rapidly hit your Space bar as quick as you can. It has to be extremely fast.
- The goal is to get the pointer all the way over towards the horse icon on the right. You have 10 seconds to get the pointer over to the right, or you will fail taming.
- Keep approaching the horse until you can press F5 to feed 5 Lumps of Raw Sugar.
- Pres R key to mount the horse
- Ride horse to the wagon, then interact with the horse that is pulling the wagon.
- Speak to the Black Cat to finish and portal back to the Magnus.
If you fail, the wagon will replenish your ropes and sugar.

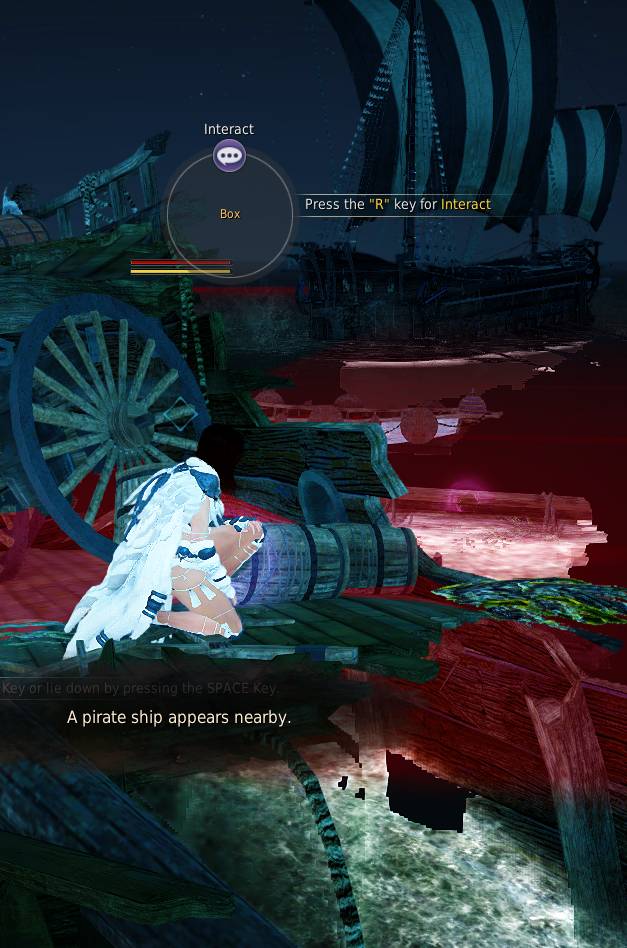
Captivating Cruise
UPDATE: from Patch Notes 7-19-23:
- An accident has occurred where some parts of the abyss sank down too deep. Thanks to the energy gathered from solving many errors, the Abyssal Veins is in perfect order.
- Below are the parts lost to the depths.
- A Rowdy Crowd
- Captivating Cruise
- Due to their disappearance, related Magnus quests had their completion conditions adjusted.
- Below are the parts lost to the depths.
Guide before patch
Captivating Cruise
The object of this mini-game is to find a flare in the wreckage and set if off at the top of the ship’s prow while avoiding detection by circling pirate ships.
The pirate ships’ large detection area is shown in red around them. Avoid detection of the pirate ships by crouching or swimming under water.
Interact with the object, “A Light Stuck Between Books” to begin the game.
Interact with objects on the wrecked ship and debris that have a faint purple glow until you find a Flare.
The quest objective text for finding the Flare will be grayed out when you have found it.
TIPS: While crouched, try adjusting the camera angles with mouse and arrow keys to better see the pirate ships. Move while crouched when possible. Note any objects with a purple aura. Be patient and pounce on the objects when the area is clear. Immediately crouch after interacting with objects and check your Quest UI to see if you have found the flare as there is no obvious notice.
When you are safe from pirate detection, climb to the ‘High Spot’ at the tip of the ship’s prow and interact with it to complete the quest. It’s at the front of the ship, at the end of the pole that has a red ribbon hung underneath.
Talk to the Black Cat, go back to the Magnus, speak to Wuju and take the Valencian Abyssal Vein. This unlocks remote storage for Valencia territory.
Investigate the 3 suggested well locations near Fohalam Farm, then head south to speak to Eileen. Afterwards, go north to the location suggest by Professor Libero. After a short cut scene, you will be portaled to a well at Erdal Farm.
Use the well to go to the Magnus and speak to Wuju. Begin the next set of games.
