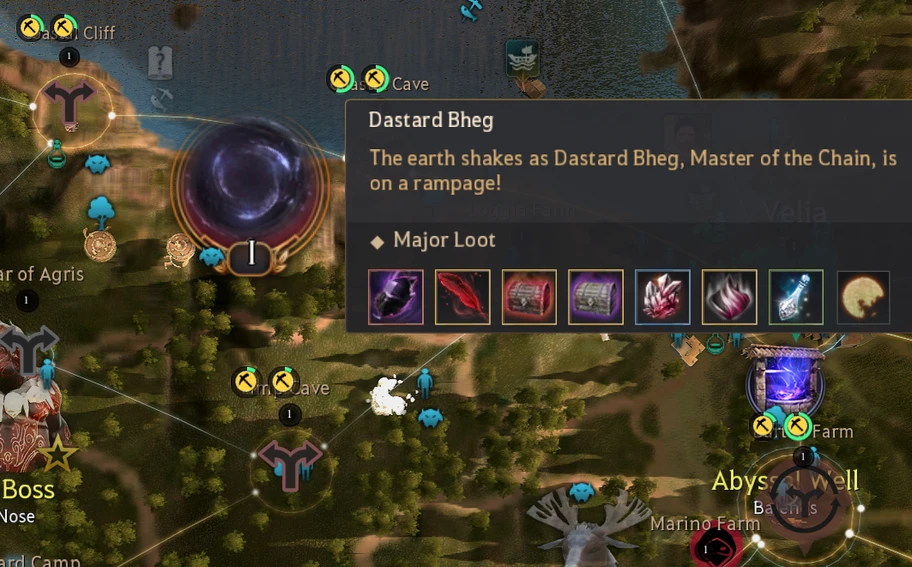
Dark Rifts offer players the opportunity to obtain DUO accessories and enhancement items by defeating bosses.
Dark Rift Bosses are unique because they keep any damage you deal to them, without having their health reset and they never de-spawn.
Dark Rifts are solo only, being visible only to you.
Dark Rifts respawn 120 hours (5 days) after being defeated.
Dark Rifts were added February 13th 2019, on the NA server and have had several updates since.

Dark Rift Highlights:
- Requirements: have at least 1 character within your account who is level 56+.
- Dark Rift monsters start to appear 24 hours after achieving level 56.
- Alts under level 55 must attack first before being attacked by a Dark Rift boss.
- You can have all 6 Dark Rift bosses available at one time. You cannot have multiple of the same boss, however. (Dark Rift events have increased this number by 3 temporarily, in the past.)
- Dark Rift bosses never de-spawn until you defeat them, even after maintenance.
- There is no death penalty from Dark Rift bosses. (No XP or crystal loss)
- Boss health never resets or regenerates even if you die.
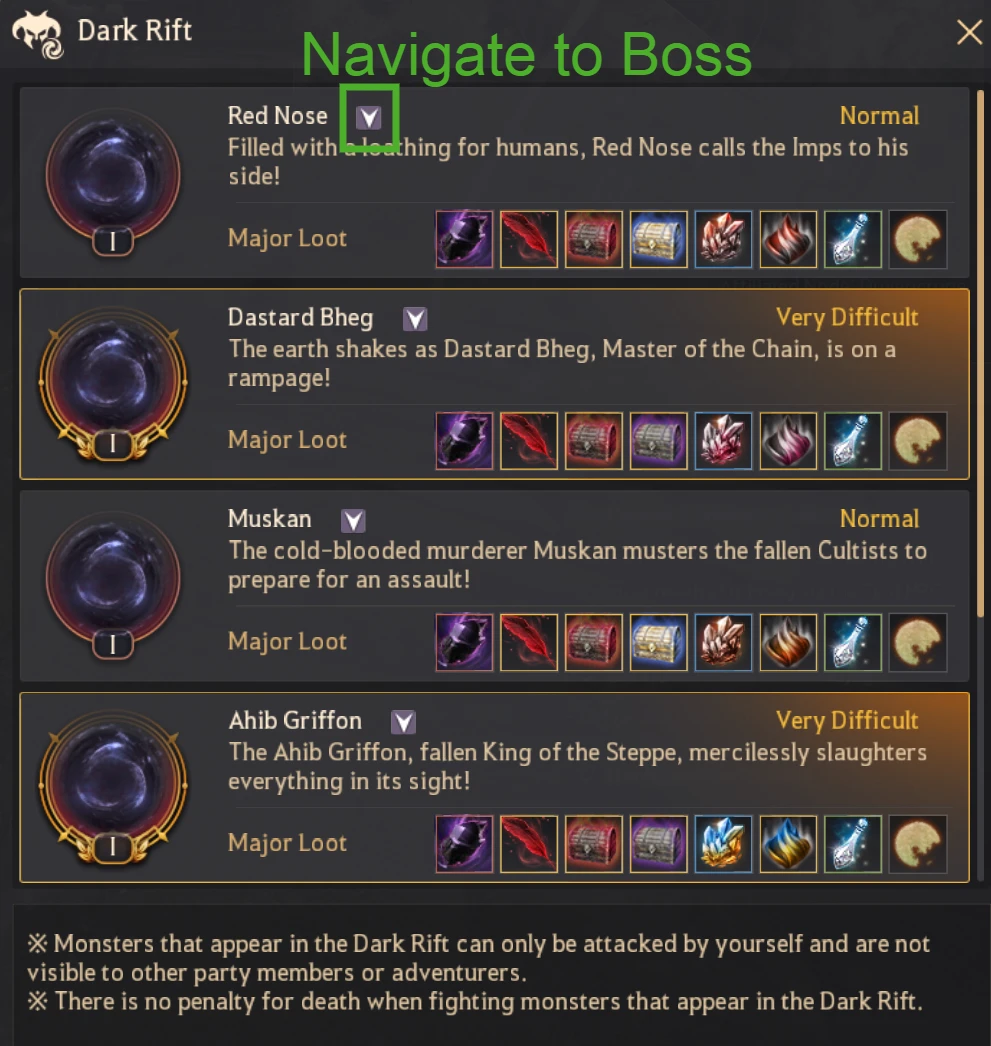
- The Dark Rift window shows all spawned bosses, with their level, rewards, difficulty, and a location button.
- Bosses cannot be attacked during Conquest/Node War, so switch channels if this is the case.
- After you initiate combat with a Dark Rift boss, other players will not be able to see or PVP you.
- Dark Rift bosses that haven’t been killed in 24 hours will lose levels and AP/DP.
- Level Ranges: I, II, III, IV, and V.
- 1 level is lost every 24 hours.
- Lost levels do not lower or degrade obtainable loot.
- You don’t have to stay logged in. Bosses lose levels regardless.
Dark Rift Boss Window
The Dark Rift Boss Window is accessible by pressing the Dark Rift icon at the bottom right of your screen.
The number shows the number of bosses that have spawned.
Dark Rift Window Details:
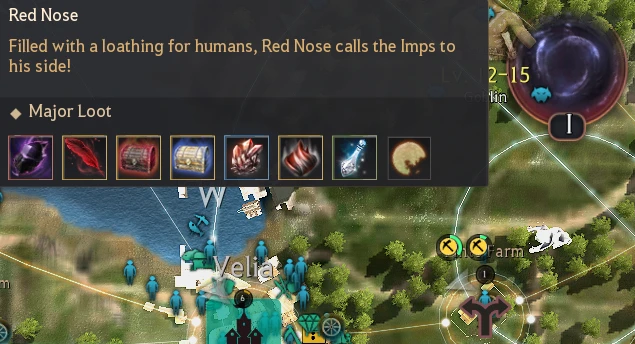
- Navigate Arrow Button: draw a path to Dark Rift boss.
- Major Loot: Dark Rift Reward loot items for defeating the boss.
- Boss Difficulty: Normal → Difficult → Very Difficult
- Boss Level: I to V levels. Level V means the boss recently spawned within 24 hours and it’s at maximum level. Dark Rift Boss level decreases by 1 every 24 hours.
Dark Rift for Pavino Greko Log
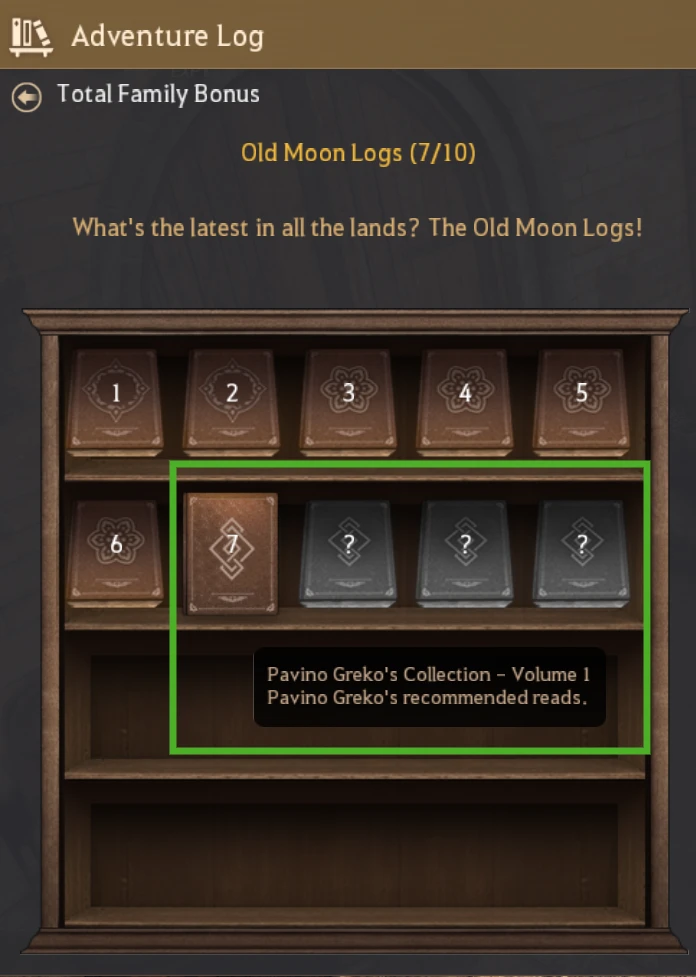
Before beginning your Dark Rift hunting, consider looking into Pavino Greko’s Collection Vol. 1.
This Adventure Log requires you to complete all 6 Dark Rift bosses.
It begins with Book 7 of the Old Moon Logs series.
Pavino Greko Requirements:
- Level 58+
- Quest, “[Adventure Log] Old Moon Logs” from Black Spirit (,) → Suggested.
- Open Volume 1: give 5x 1,000G Gold Bar to Pavino Greko (500 million in silver).
For deatils visit this Pavino Greko Adventure Log Guide.
Dark Rift Loot Rewards
Do I Get All Loot Shown?
The rewards shown are not guaranteed each time.
Some items drop every time. For these items, the quantity varies for Memory Fragments, Black Stones, and Spirit Dust, depending on the Dark Rift difficulty. Harder difficulty seems to reward a greater quantity of Black Stones.
You can obtain some very rare rewards like Rich Merchant’s Ring Piece. Accessories are given via the chest. The chances to obtain an accessory seems to have been improved. Maybe a 50% chance of obtaining any accessory. Otherwise you get 2 to 13 Cron Stones from the chests.

Dark Rift Boss: Dastard Bheg
Difficulty: Very Difficult

Dark Rift Boss: Muskan
Difficulty: Normal

Dark Rift Boss: Red Nose
Difficulty: Normal

Dark Rift Boss: Ferrid
Difficulty: Difficult

Dark Rift Boss: Dim Tree Spirit
Difficulty: Difficult

Dark Rift Boss: Ahib Griffon
Difficulty: Very Difficult
Dark Rift Rare RNG Loot:
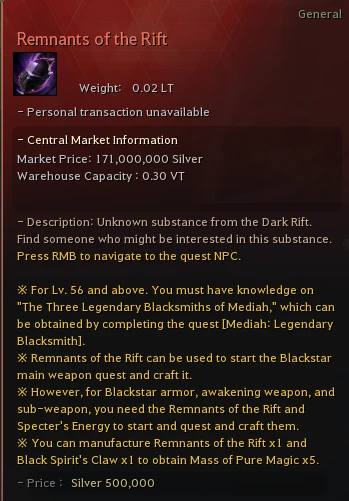
 Remnants of the Rift
- Right Click to start the Blackstar Weapon or Blackstar Armor quest lines.
- For Level 56+. Requires Knowledge ‘The Three Legendary Blacksmiths of Mediah’, which can be obtained by completing the quest The Three Blacksmiths.
- Also used to create Blackstar Enhancement material, Mass of Pure Magic. Remnants of the Rift x1 + Black Spirit’s Claw x1 = Mass of Pure Magic x5.
 Rich Merchant’s Ring Piece very rare drop used to create Rich Merchant’s Ring.
 Mythical Feather to upgrade a T9 Dream Horse to a T10 Mythical Dream Horse
 Shimmering Piece of the Old Moon exchange it to get +5% Central Market Silver Collection for one transaction.
 Marsh’s Artifact – increase AP or Accuracy
 Lesha’s Artifact – increase DR or Evasion
 Box of the Howling Dead – guaranteed yellow grade accessory
 Accessories like Deboreka Earring – top tier AP and Accuracy. BIS earring for sheet AP without a DP penalty.
Dark Rift Normal Loot:
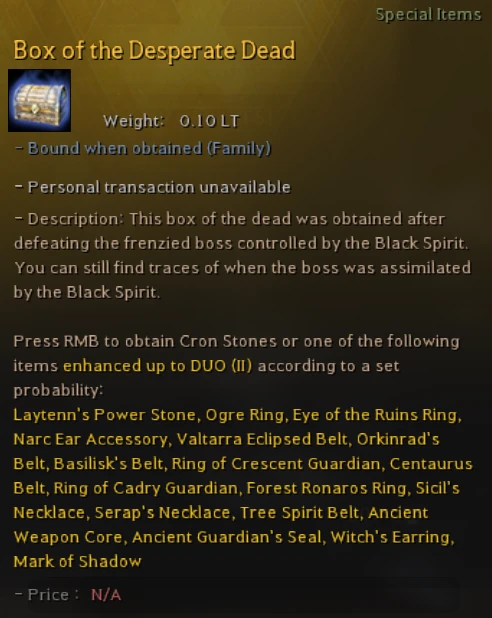
 2x Chests: Box of Desperate/Distorted/Silent Dead. See details below.
 1 to 2 Latent Boss Aura used to upgrade Jetina Guaranteed PEN Gear.
 1 to 2 Concentrated Boss Crystals used to upgrade Jetina Guaranteed PEN Gear.
 Black Stone: Enhance gear
 Memory Fragment: Repair Max Durability and change skill addons.
 5x Dark Spirit’s Greed: Exchange for a variety of valuable loot. See details below.
 30 to 60 Ancient Spirit Dust: Combine Ancient Spirit Dust x5 and Black Stone x1 to make Caphras Stone x1
 1 Dawn Black Stone used to enhance Kharazad Accessories.
Dark Rift Chest Rewards
Every Dark Rift boss drops 2 chests. The best chests drop from the bosses that are “VERY DIFFICULT.”
Ruuuun!! 🙂 Just teasing.
x2 Chests from NORMAL Dark Rifts.
Obtain Cron Stones or one of the following items enhanced up to DUO (II) according to a set probability:
| Item | Chance |
|---|---|
| 2.5875% | |
| 2.6562% | |
| 2.7287% | |
| 2.8052% | |
| 2.8862% | |
| 2.9719% | |
| 3.063% | |
| 3.1597% | |
| 4.8478% | |
| 5.0948% | |
| 5.3682% | |
| 5.6728% | |
| 6.0139% | |
| 6.3987% | |
| 6.8361% | |
| 7.3378% | |
| 7.9188% | |
| 8.5998% | |
| 100% |
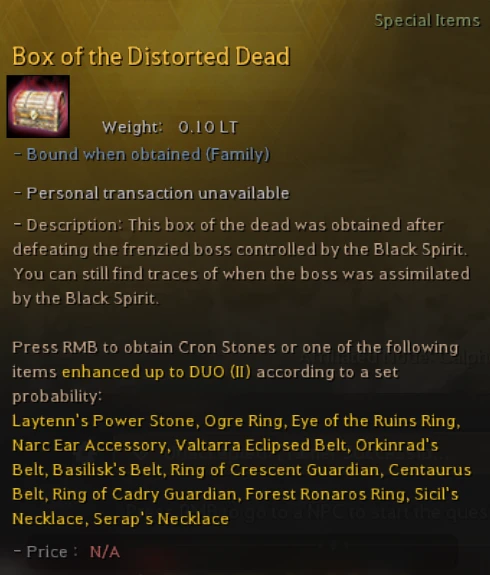
x2 Chests from DIFFICULT Dark Rifts.
Obtain Cron Stones or one of the following items enhanced up to DUO (II) according to a set probability:
| Item | Chance |
|---|---|
| 2.5874% | |
| 2.6562% | |
| 2.7286% | |
| 2.8052% | |
| 2.8861% | |
| 2.9719% | |
| 3.0629% | |
| 3.1597% | |
| 9.6954% | |
| 10.7364% | |
| 12.0277% | |
| 13.6721% | |
| 15.8374% | |
| 100% |
x2 Chest reward from VERY DIFFICULT Dark Rifts.
| Item | Chance |
|---|---|
| 7.3093% | |
| 7.8857% | |
| 8.5607% | |
| 9.3622% | |
| 10.3292% | |
| 11.519% | |
| 13.0186% | |
| 14.9671% | |
| 100% |

- Box of the Howling Dead has a low chance of dropping from ALL Dark Rifts.
| Item | Chance |
|---|---|
| 12.3902% | |
| 14.1426% | |
| 25% | |
| 33% | |
| 50% | |
| 100% |

Dark Spirit’s Greed
You obtain 5 Dark Spirit’s Greed for every Dark Rift boss you defeat.
Dark Spirit’s Greed Exchange UI:
- Click the Manage Currency icon
 at the top right of the screen OR…
 - Menu (Esc) → Rewards (F3) → Manage Currency Menu
Exchangable at all times:
| Dark Spirit’s Greed Reward | Price |
|
|---|---|---|
| Advice of Valks (+50) | 50 | |
| Latent Boss Aura | 2 | |
| Mass of Pure Magic x10 | 1 | |
| Gold Bar 10G x2 | 1 | |
| Gold Bar 100G x1 | 5 |
Weekly Exchanges:
Enjoy these rewards after every weekly reset.
| Dark Spirit’s Greed Reward | Weekly Limit |
Price |
|
|---|---|---|---|
| Perfume of Courage | 2 | 15 | |
| Supreme Cooking Utensil | 2 | 10 | |
| Supreme Alchemy Tool | 2 | 10 | |
| Item Collection Increase Scroll | 3 | 5 | |
| Old Moon Alchemy Catalyst x2 | 5 | 3 | |
| Krogdalo’s Origin Stone | 2 | 20 | |
| Laila’s Petal x10 | 2 | 2 |
A Meager Lacking Few…
Severly limited items below.
| Dark Spirit’s Greed Reward | Limit | Price |
|
|---|---|---|---|
| Black Spirit Crystal | 1 | 50 | |
| Awakened Spirit’s Crystal | 1 | 50 | |
| Valtarra Spirit’s Crystal | 1 | 50 | |
| Advice of Valks (+100) | 1 | 30 | |
| Specter’s Energy | 3 | 10 |
Dark Rift Gear & Combat Tips
Dark Rift Bosses can be challenging for new players and especially those new to a class. Don’t run in mindlessly, expecting the boss to fall in a few minutes unless you are an expert in the class.
Study the boss’s movements and you will start to learn their patterns of attack. When you can anticipate their moves, you can dodge attacks to survive and win.
Dark Rifts are placed right in the middle of normal grinding areas. This means you have to consider how well you can fight mobs at that location. While fighting the boss, anticipate having to run away and move through mobs that chase you and block movement or even stun you.
Dark Rift Combat Tips:
- HP Pots: Bring lots of HP pots
- Boss Combat Basics: Learn your class skills that help in defense like Forward Guard, Superarmor, and Invincibility. Learn your evasive moves that will make your character side step out of danger. Without using these, you will get frustrated. Learn which skills give Healing.
- Begin with Fast Attacks: Use fast attacks + evasive moves until you learn all of the boss movements. On the melee attacks, iFrame behind them and Back Attack them. On charges, dodge and iFrame behind for Back Attack. Try to attack from behind. For AOE’s that bypass block and FG, learn to avoid.
- S-Block – Walking backwards for Forward Guard: Evade skills eat up Stamina and walking backwards may help while you recharge Stamina.
- Help from a Friend: Ask a friend to clear mobs around the boss, while you fight, if you are too low-geared to handle both at the same time.
- Time Debuff: Players report Dark Rift bosses weaken after 15 to 30 minutes of fighting. (Seperate from the de-leveling after 24 hours.)
- Reset Boss Location: When you run away too far, the boss will run back to his spawn point, but still keep the damage you dealt. This frees you to pick off boss adds that may have spawned and surrounding mobs. Or you can Back Attack him as he runs.
- Recommended AP/DP Gear: You will want at least beginner Naru Gear that has been enhanced. See details below.
- Low-geared Players: Don’t give up if you die. It’s still doable. Boss health doesn’t reset. Just expect a longer fight, because you will have to run back to the spawn location on death. (unless you use Elion’s Tears)
- Food Rotation + Elixirs:
- Damage modifiers like back attack and crit damage increase are better than AP.
- Kamasylvia Meal for Back Attack +5%
- King of the Jungle Hamburg for Critical Hit Damage +5%
- Serendia Meal for AP +5 and Accuracy +10
- Elixir of Lethal Assassin for Back Attack Damage +15%.
- Elixir of Sharp Detection for Critical Hit Damage +15%
- Giant’s draught is much better than beast’s draught due to the all special attack +10%.
Minimum Dark Rift Gear Recommendation
It’s best if you can wear Tuvla PEN gear or better to visit your first Dark Rift boss.
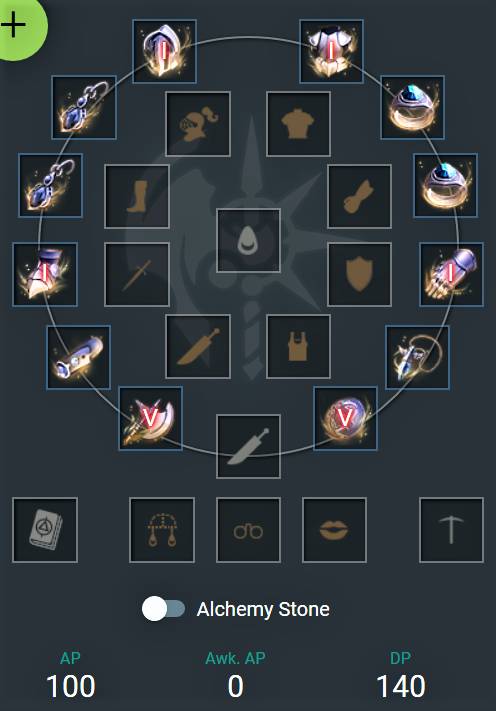
At the very least have a full set of Naru armor that is PRI level and Naru weapons of PEN level. (Gear Score: 240)
- AP 97~103 (100)
- Accuracy 192
- DP 140
- Max HP 200
- Max Stamina 100
- Weight Limit 10LT
- Bonus AP 5
Defense
- Damage Reduction 69
- Evasion 71
- Hidden Damage Reduction 10
- Hidden Evasion 179
Effects
- Attack Speed 4
- Casting Speed 2
- Movement Speed 2
Best Classes for Dark Rifts?
I have found the Guardian to be my favorite class to use for Dark Rifts. She has some great protected skills and feels tanky. Any class that has good movement and/or healing capability will help, such as Witch/Wizard, who have direct heals and Lahn, with many offensive HP regen skills. Classes with a summon can help take aggro off of you for a bit.
Dark Rift Boss List & Strategies
Dark Rift bosses are separated into 3 categories of difficulty. Normal → Difficult → Very Difficult
Difficulty determines the type of chest obtained. Harder boss = better chest. (Boss level makes no difference in chest reward.)
Tier 1 Difficulty: “Normal”
Tier 2 Difficulty: “Difficult”
Dim Tree Spirit
Location: Calpheon
STRATEGY: Dim Tree Spirit spawns in some challenging environments with lots of boulders and/or trees. If you get too far from Dim Tree, he will long range attack, which hits 100%. This is a heavy hitting attack that you must invuln or block. Don’t get too close or his melee will Back Attack you and bypass your block. He and his adds have rapid fire knockdown, so you will need block and/or quick strafing.
Loot Box: ![]() Box of the Distorted Dead
Box of the Distorted Dead
Tier 3 Difficulty: “Very Difficult”
Dastard Bheg
Location: Serendia
STRATEGY: Dastard Behg is CC happy. His normal attack with that nasty grappling hook has an obscenely long ranged Knockdown! Ack, he can be a pain to say the least. Keep strafing and using quick attacks. Finding that narrow window when you can hit him is tricky.
Loot Box: ![]() Box of the Silent Dead
Box of the Silent Dead
Ahib Griffon
Location: Old Wisdom Tree, Kamasylvia STRATEGY: Paints the ground red before his heavy hitting attack. Run out of the red area. He rears up and back before his very foul breath attack. Try not to wander out of the small cleared circle that he spawns in. If you accidently shoot the native mobs surrounding Ahib Griffon’s spawn point, it can be a real pain. Don’t forget you can run away from the mobs to reset them to their original spawn location. Loot Box:In patch Dark Rift Bosses were improved and 6 were removed:
Steel Nux
Kavali
Ancient Puturum
Ruins Guard Tower
Saunil Siege Captain
Ronin
[Event] Dark Rift Bosses
Sometimes there are events that temporarily spawn event bosses.
[Event] Titium
Location: Calpheon
Difficulty: Normal
STRATEGY: This was a limited time event boss that spawned more frequently than normal Dark Rift bosses. Special event dark rifts have the same chance as standard Dark Rifts to drop Remnants of the Rift.
Tier 1 Loot Box: ![]() Box of the Desperate Dead:
Box of the Desperate Dead:
[Event] Skeleton King
Location: Mediah
Difficulty: Difficult
STRATEGY: This was a limited time event boss that spawned more frequently than normal Dark Rift bosses. Special event dark rifts have the same chance as standard Dark Rifts to drop Remnants of the Rift.
Tier 2 Loot Box: ![]() Box of the Distorted Dead
Box of the Distorted Dead
[Event] Leebur
Location: Drieghan
Difficulty: Very Difficult
STRATEGY: This was a limited time event boss that spawned more frequently than normal Dark Rift bosses. Special event dark rifts have the same chance as standard Dark Rifts to drop Remnants of the Rift.
Tier 3 Loot Box: ![]() Box of the Silent Dead
Box of the Silent Dead

▲ [Event] Titium/[Event] Skeleton King/[Event] Leebur
The monsters above will reappear slightly faster compared to the normal Dark Rift monsters.
|
[Event] Titium |
[Event] Skeleton King |
[Event] Leebur |
During a Rift Event, extra Dark Rifts can be spawned at one time. (Normally, 6 can be spawned.)
Defeat the event Dark Rift monsters to obtain the default Dark Rift rewards and have a chance to obtain the  Box of the Enraged Dead.
Open the Box of the Enraged Dead to obtain one of the items below:
 Giath’s Helmet |
Bheg’s Gloves |
|
Griffon’s Helmet |
Leebur’s Gloves |
|
Red Nose’s Armor |
Muskan’s Shoes |
|
Dim Tree Spirit’s Armor |
Urugon’s Shoes |
The event monsters have the same chance of dropping the Remnants of the Rift as the normal Dark Rift monsters.


