Hunting with a matchlock is one of my favorite Life Skills. Besides being able to shoot a mega gun, half the size of Velia, I get to stalk evil killer animals ravaging ocean, sky, and forest!
These ferocious beasts have a unique title of <Wild>. They can only be killed with matchlocks and not normal weapons.
A different title of <Boss> or similar means it’s a rare wild animal spawn. It will have more HP and difficulty, but will drop a large amount of loot.
Bad Joke #007:
How do you hunt a unique wolf? Unique up on it! How do you catch a tame wolf? Tame way – unique up on it!
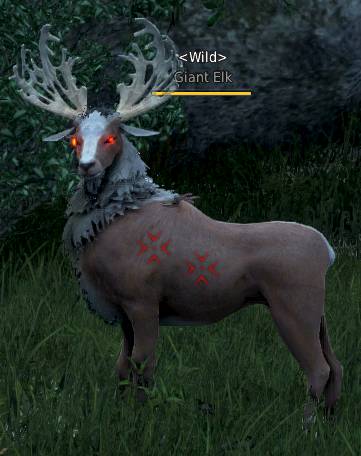
Awww a cute friendly elk! Umm, wait.. red eyes?!
Maybe he’s a meat eater?
Hunting Money & Rewards
Hunting has been reworked several times to improve money and item drops.
A master hunter with adequate gear should expect 250 to 525 million silver per hour. (High end veteran hunters can reach up 700/hr or even more than a billion, depending on location.)
The greatest influences to hunting money are Hunting Mastery, Hedgehog, and location.
But as with everything in BDO, other variables can influence money:
- Inventory Space, Storage, Tent, Maids
- Item Brand Stone on your Matchlock (highly recommend)
- Hunting buffs (details below)
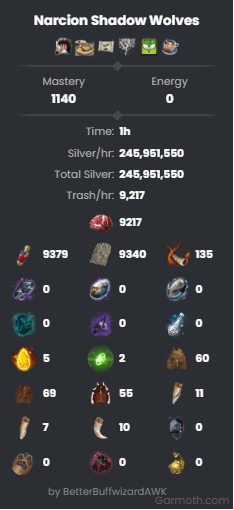
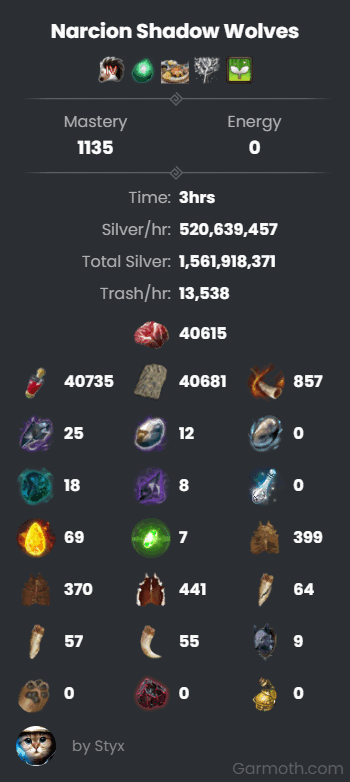
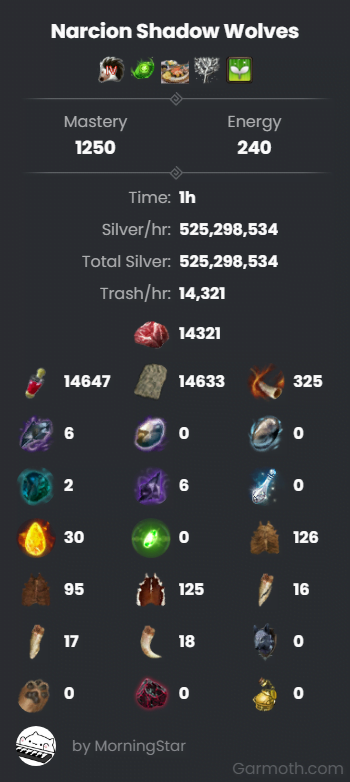
Thank you to Morningstar, Styx, and BeterBuffwizardAWK for sharing their money earned (up 525 million per hour) at Narcion Shadow Wolves! (Images generated by garmoth.com, where you can input your hunting data and it calculates your money per hour at certain hunting spots.)
Thank you also to GPW for the Hunting Profit Spreadsheet!
Common Hunting Drops:
More difficult mobs have the best drop amounts.
 Blood (3 to 13)
 Meat (3 to 13)
 Hide (3 to 50)
 Feather (1 to 17 – bird mobs)
Some mobs only have 1 or 2 of the 3. For example, elephants drop only hides, but in large quantities.
Rare Hunting Drops:
 Caphras Stone
 Fire Horn
 Sharp Black Crystal Shard
 Hunting Mastery drops (hides/teeth to craft trade items)
 Black Gem Fragment
 Breath of Narcion (Master Matchlock + Furniture)
 Breath of Omua from Everfrost Mobs (Furniture)
 Black Gem
 Concentrated Magical Black Gem
 Hunting Byproduct
Wildspark is a hunting byproduct that can be obtained at a fixed probability when butchering wild hunting mobs.
- Requires Hunting Mastery of 250+
- You can obtain Wildspark as loot upon defeating [King of the Grass Rhinos] Rawr-rawr and other hunting mobs.
- Collect 10 Wildsparks and visit NPC Liana in each major city to exchange them for the items below.
Exchange List:
- Wildspark x10 = 900 Contribution EXP + Hunting EXP x30
- Wildspark x10 =
 Black Gem Fragment x5
 - Wildspark x10 =
 Spirit Pouch of Ferocious Beast

Wildspark has the best drop rate from Shadow Wolves at Narcion. (400+ per hr.)
Hunting Drop Amounts
The chart below shows the base amount of blood, meat, and leather you can expect from Hunting.
Hunting Mastery and Hedgehog greatly influence the item amounts. Birds are marked with *feather because they drop feathers instead of leather.
| Meat |
Blood |
Leather |
|
|---|---|---|---|
| [Wild] Giant Boar | 3~5 | 3~5 | 3~5 |
| [Wild] Giant Elk | 3~5 | 3~5 | 3~5 |
| [Wild] Wolf | 3~5 | 3~5 | 3~5 |
| [Wild] Giant Fox | 3~5 | 3~5 | 3~5 |
| [Wild] Giant Wolf | 4~7 | 4~7 | 4~7 |
| [Wild] Giant Mountain Sheep | 6~10 | 6~10 | 6~10 |
| [Wild] Drieghan Male Goat | 6~10 | 6~10 | 6~10 |
| [Wild] Drieghan Female Goat | 6~10 | 6~10 | 6~10 |
| [Wild] Llama | 6~10 | 6~10 | 6~10 |
| [Wild] Gazelle | 6~10 | – | 6~10 |
| [Wild] Feather Wolf | 6~10 | 6~10 | 6~10 |
| [Wild] Kamasylvia Weasel | 6~10 | 6~10 | 6~10 |
| [Wild] Giant Brown Bear | 7~10 | 7~10 | 7~10 |
| [Wild] Giant Lioness | 7~11 | 7~11 | 7~11 |
| [Wild] Giant Lion | 7~11 | 7~11 | 7~11 |
| [Wild] Yak | 7~11 | 7~11 | 7~11 |
| [Wild] Phnyl | 7~11 | 7~11 | 7~11 |
| [Wild] Ferrica *feather | 7~11 | – | 7~11 |
| [Wild] Ferrina *feather | 7~11 | – | 7~11 |
| [Wild] Grass Rhino | 8~12 | 8~12 | 8~12 |
| [Wild] Verdure Buck | 8~12 | 8~12 | 8~12 |
| [Wild] Verdure Doe | 8~12 | 8~12 | 8~12 |
| [Wild] Shadow Wolf | 8~12 | 8~12 | 8~12 |
| [Wild] Shadow Lion | 9~13 | 9~13 | 9~13 |
| [Wild] Belladonna Elephant | – | – | 50~70 |
| [Wild] Black Leopard | – | – | 50~70 |
| [Wild] Baby Belladonna Elephant | – | – | 25~35 |
| [Boss] Grass Rhino | 35~55 | 35~55 | 35~55 |
| [Boss] Verdure Buck | 30~50 | 30~50 | 30~50 |
| [Boss] Shadow Wolf | 30~50 | 30~50 | 30~50 |
| [Boss] Shadow Lion | 32~53 | 32~53 | 32~53 |
Hunting Trophies
Hunting allows you to obtain many different heads and animal parts to craft furniture with powerful buffs.
For a list of Hunting Furniture, please see this Hunting Mastery Guide.
Hunting Step by Step
To begin hunting, you will need to equip a matchlock and a butcher knife.
You will also need Energy, obtained via completing Knowledge topics.
- Right click your butcher knife and matchlock when idle to equip them.
- Then you must right click to load 3 bullets into your matchlock. (4 Bullets for players with Guru 1 Hunting.)

The maximum bullets any matchlock can hold is 3 and then 4 when you reach Guru 1 Hunting level.
Sometimes the game will only show 1 bullet after reloading, but will increase to the correct amount after a bit.
Hunting Master 1 or higher can complete the quest, “Hunter’s Dream” in the Narcion region, to automatically reload a bullet in their matchlock when dodge rolling in any direction.
The normal reloading animation feels like a long animation when you have a deadly animal racing toward you, but you can start shooting from a greater distance and reload faster when crouched. Attack/Casting speed decreases reload time.
Hunting Cross Hair Colors
When you’re in your shooting stance, you need to watch your cross hair. Never shoot unless it’s red or you have auto targeting turned on.


Matchlock
There are a few different Matchlocks you can obtain as a beginner.
- Practice Matchlock: rent for 2 Contribution Points. The practice matchlock cannot be repaired. It must be returned to the npc and rented again to replenish the durability. Only use this if you have no other choice or if it’s required in a quest.
- [Event] Beginner Hunter’s Matchlock: Best choice. Excellent beginner Matchlock that is almost equal to a +10 Beginner Matchlock, but can only be obtained by completing 8 objectives in Progression Pass. (Progression Passs is available after Season Graduation.)
- Beginner Matchlock: If you don’t have [Event] Beginner Hunter’s Matchlock yet, this can be used at low levels. Get one for free at level 30 by completing the quest Chuck Laurie the Hunter (no other requirements).
Item Brand Spell Stone reduces Durability consumption of matchlocks by 50%. (costs 400 Pearls)
To see details and higher tier options, please visit this Matchlock guide.

Butcher Knife
In order to obtain loot and experience from the wild animals you defeat, you will need to butcher the corpse with a Butcher Knife.
Gathering AND Hunting Life Skills increase when butchering animals killed with a matchlock.
Hunting requires gathering, but in some instances does not benefit from buffs that apply to gathering.
Gathering Item Drop Rate vs Item Drop Rate:
- Item Drop Rate → NO
- Gathering Item Drop Rate → YES, except for Lucky and Magic Butcher Knives (source)
Gathering Buff Exclusions:
- Gathering Mastery does not affect Hunting in any way.
- Item Drop Rate and Item Drop Amount from scrolls has no effect on Hunting.
- Agris Fever has no impact on Hunting loot.

Hunting Exp comes as a drop from butchering the corpse of a wild animal.
Hunting Exp is NOT obtained just by killing a wild animal with a matchlock.
The hedgehog pet has a 50% chance at tier 4 to proc a second gather roll, which gives a second Hunting XP drop and greatly increases money and Hunting exp earned.
Which Butcher Knife is Best for Hunting?
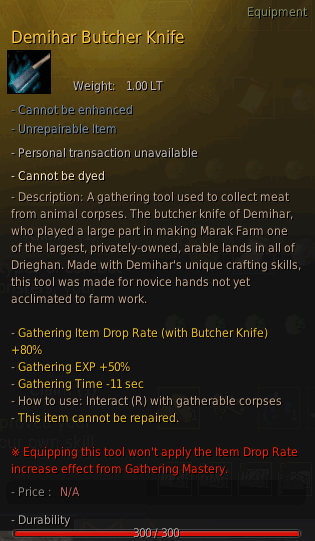
In the beginning, use the Demihar Butcher Knife. It has some nice buffs for new hunters and it helps you quickly level the Gathering Life Skill.
- Gathering Item Drop Rate (with Butcher Knife) +80%
- Gathering EXP +50%
- Gathering Time -11 sec
- 300 durability
- Cannot be repaired
- Equipping this tool won’t apply the Item Drop Rate increase effect from Gathering Mastery.
- Demihar Gathering Tools last for 14 days, and you won’t be able to use them after they expire. Boxes don’t have a time limit when you obtain them. So don’t open any boxes until you are ready to do some gathering/hunting.
Obtaining a Demihar Butcher Knife:
- You can obtain a Demihar Butcher Knife after reaching level 60 on a Season Character and starting the Treant’s Tear quest line.
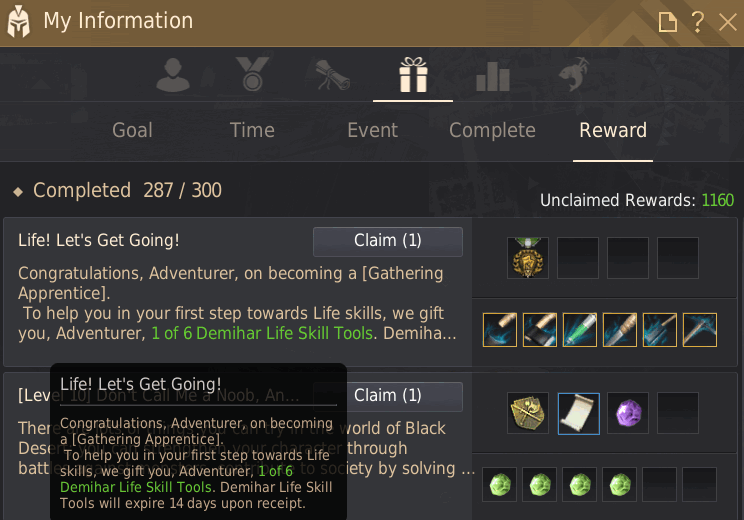
- Challenge Reward (Y) for reaching Apprentice 1 Gathering. (Choose 1)
- Look for them whereever special event rewards are given. Ex. a Loyalties purchase.
Mastery Butcher Knives
The Mastery Tools (Loggia, Dostter, or Manos Butcher Knives) have benefits over disposable butcher knives. They have a greater cost investment, but last forever and can be sold via the marketplace to recoup some of their cost when you are ready to upgrade.
- Repairable: Mastery Butcher Knives are repairable, use 1 inventory space, and don’t require crafting or re-purchase. You can repair them at your tent or NPC.
- Item Brand Stone: Butcher Knives that are branded reduce Durability consumption by 50%.
- Top Max Durability Potential: Mastery Butcher Knives can be enhanced for greater Max Durability. (Although only PEN Manos has 250 Max Durability, equal to Magic Butcher Knife.)
- Gathering Speed: All Mastery Butcher Knives give the best gathering speed of -11 seconds (equal only to Magic Butcher Knife)
- Gathering Item Drop Rate: All Mastery Butcher Knives give the same amount of +30% gathering.
Butchering Minigame
The Green Thumb gathering mini game does NOT occur when harvesting <wild> mobs that you kill with a matchlock or sniper rifle.
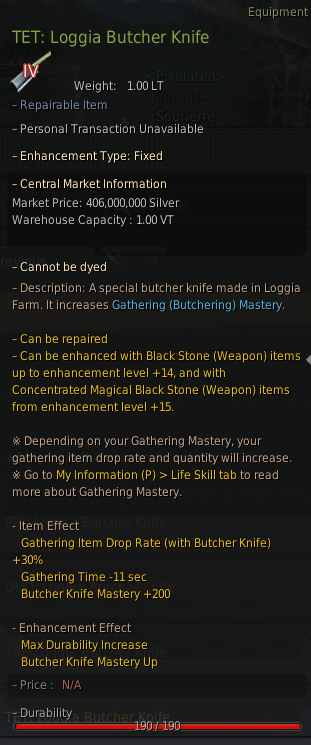
This TET Loggia Butcher Knife has lower Max Durability than a Magic Butcher Knife, but can be repaired and branded to consume less Durability.
Hunting Progression Pass
The Hunting section of Progression Pass is good to do in order to obtain a nice Matchlock for beginning hunters.
Progression Pass becomes available after Season Graduation.
| Category | Goals | Rewards | Additional Rewards |
|---|---|---|---|
| Hunting/Butchering | x4 | Ship License: Epheria Cog (Kalis-Certified) | 23 Total Goals: Caphras Stone x23 |
| x8 | [Event] Beginner Hunter’s Matchlock | ||
| x12 | Breath of Narcion | ||
| x16 | [Event] Item Brand Spell Stone | ||
| x20 | Breath of Narcion |

Hunting Mechanics
Using a matchlock for the first time can be tricky until you learn all the tricks! 🙂
Hunting Key Board Commands:
- RMB: Load the gun with max 3 bullets (4 for Guru Hunters) This can be delayed by attacks.
- LMB: Enter Ready Stance. LMB again to fire bullet.
- F: Fires your weapon, using 100% of Black Spirit’s Rage to increase damage.
- Hold Shift + W: Sprint while standing with a matchlock to increase movement speed.
- W+W: double tap any directional key while standing causes you to dodge roll in that direction. Master 1 Hunting also gives 1 bullet. (1 Bullet is only added when there are 0 bullets before the dodge roll. Sometimes the 1 bullet doesn’t register, but it’s still there.)
- SPACE BAR: climbs small walls and obstacles in front of you. You can’t jump normally while a matchlock is equipped.
- Q: Crouching stance increases your firing range, but has special rules. (See details below.)
- Shift + W + LMB: press LMB while sprinting to do a sliding shot. The shot after the sliding shot activates quickly.

Hunting Stances
- Passive Stance: standing or moving with a matchlock equipped. You can’t immediately shoot from this stance.
- Ready Aim Stance: matchlock sparks. Enter this by pressing LMB once. LMB again to shoot. (or just hold down LMB)
- Mounted Horseback: used for unique boss hunting mobs that fly like Fugitive Khalk and King Griffon
- Reloading Stance: takes about two seconds, but can be decreased with Attack/Cast Speed buffs.
- Crouching Stance: shoot from a greater distance and decrease reload time.
- Rolling or Dodging Stance: quickly move away from an animal to avoid hits and reload without being hit. You take 0 damage from mobs when rolling.
Learning when to reload is part of the fun of hunting. Reloading while a difficult monster is pounding on you isn’t the best situation to be in as your reload can be slowed and your HP can quickly fall. (It feels like you are being interrupted.)

Hunting with Crouch
When you’re crouched, your hunting range is increased. It will take some practice, but soon, you will be able to learn by eye, the distance in which crouch will allow you to hit a distant animal.
- Crouching reduces the reloading duration by 25%. (source)
- Crouch increases crit rate and dps by improving speed, but also slows your movement speed.
Crouch Mechanics:
- Press Q to go into a crouch.
- When you move while crouching, you are slowed and will stay in a crouched position.
- Crouch prevents you from sprinting.
- While crouching, press SHIFT + any direction but forward to doge roll in that direction.
- You can gather and reload while crouched.
- Exiting Crouch:
- Press Q again to stand up straight.
- Shift + ↑ will cause you to stand up and run instead of dodge rolling forward. (Does not work with sideways or backwards while crouched.)
While crouched, watch out for obstacles like rocks, tree stumps, and land which will block your shots.

Wild mobs at this distance can’t be hit, without crouching (Q). This allows you to kill higher HP mobs before they reach you.
Hunting Tactics for Strong Animals
Some animals can hit very hard or have difficult CC ability.
You have the option of swapping out of your Life Mastery Clothes and into normal gear and then swap back to gather the corpse. (This is tedious, but it can help with some challenging mobs.)
If you get CC’d while reloading, it prolongs your battle. You can move while loading bullets or you can dodge roll then reload, so that the animal has to stop attacking to move toward you.
You can reload while moving in any direction, and while sprinting. Normal reloading can’t occur during a dodge roll, but 1 bullet is given if you have Master 1 or higher Hunting skill and have 0 bullets, after a dodge roll.
You can roll-dodge while standing with a musket by double tapping the direction you want to roll in. Evading with a Matchlock is only required for more difficult mobs.
Some of the more difficult mobs have unique patterns of behavior. You can learn these to anticipate their moves and dodge away from heavy attacks.
It also helps to find a small rotation that you know very well. Take time to run around and learn the terrain until you find those perfect shooting spots that will give you the advantage, with plenty of distance.
Try to get in Back Attacks whenever the monster’s back is to you. A Back Attack that crits is very powerful and can one shot some animals like deer.
Hunting Gear & Stats
Hunting Level and then Hunting Mastery are the most important stats for Hunters.
Press P → Life Skill tab (Fish Icon) to view your level and Hunting Mastery.
Hunting is impacted by 4 Character “Ability” Stats visible in your Profile (P) window.
Ability Stats Used in Hunting:
- Attack Speed: 5/5
- Critical Hit: 5/5
- Gathering: 5/5 (guild gives +3)
- Movement Speed: 5/5
Other Buffs That Improve Hunting:
- Attack Speed %
- Critical Hit Chance %
- Critical Hit Damage %
- Back Attack Damage %
- Special Attack Damage %
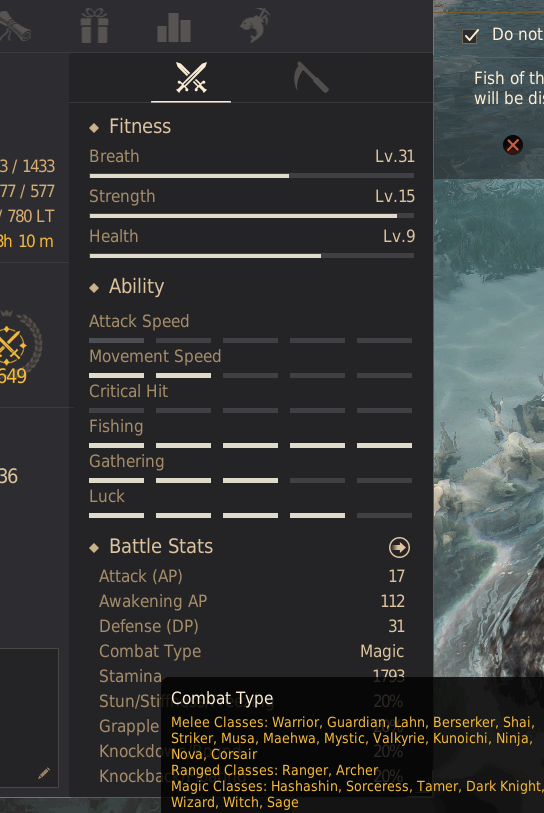
This is a terrible example of Ability Stats for a Hunter. LOL! This is my fishing Alt. 🙂
Note that Casting Speed is not considered in hunting with a matchlock. Casters still have Attack Speed, it is just a hidden stat.
| Ability | Description |
|---|---|
| Attack Speed | Higher levels increase Attack Speed. – Lv. 1: By 5% – Lv. 2: By 9% – Lv. 3: By 12% – Lv. 4: By 15% – Lv. 5: By 20% |
| Movement Speed | Higher levels increase Movement Speed. – Lv. 1: By 5% – Lv. 2: By 9% – Lv. 3: By 12% – Lv. 4: By 15% – Lv. 5: By 20% |
| Critical Hit | Higher levels increase Critical Hit Rate. – Lv. 1: By 5% – Lv. 2: By 9% – Lv. 3: By 12% – Lv. 4: By 15% – Lv. 5: By 18% |
| Gathering | Higher levels reduce Gathering time. – Lv. 1: By 25% – Lv. 2: By 45% – Lv. 3: By 60% – Lv. 4: By 70% – Lv. 5: By 75% |

Hunting Crystals
There are many crystals you can use for hunting.
WARNING: Crystals can be destroyed upon death. Use cheap crystals as you are learning.
Limit 2 from Extra Damage Group:
- Magic Crystal of Infinity – Critical Hit → +10% Crit Damage
- Magic Crystal of Infinity – Back Attack → +10% BA Damage
Cheap Attack Speed & Crit Crystal (No Group Limit):
- Ancient Magic Crystal – Carmae → Attack Speed +1, Critical Hit +1
Cheap Crit or Attack Speed Crystal (Limit 2 Increased Resistance II):
- Black Magic Crystal – Assault → Attack Speed +2
- Black Magic Crystal – Valor → Critical Hit +2
There are many more options.
Damage Crystals
| Crystal | Effect | Group |
|---|---|---|
| Magic Crystal of Infinity – Down Attack | Extra Down Attack Damage +10% | Extra Damage |
| Magic Crystal of Infinity – Back Attack | Extra Back Attack Damage +10% | Extra Damage |
| Crystal of Mysterious Darkness | All AP +2 All Accuracy +3 Back Attack Damage +12% |
Increased Extra Damage |
| Crystal of Brutal Decimation | Extra AP Against Monsters +7 Back Attack Damage +1% |
Decimation |
| Magic Crystal of Infinity – Critical Hit | Critical Hit Damage +10% | Extra Damage |
| Corrupted Magic Crystal | Critical Hit Damage +10% All AP +2 All Damage Reduction -2 – 2 crystal set effect: Critical Hit Damage +2% |
Extra Damage |
| Girin’s Tear | All Accuracy +3 Extra AP Against Monsters +10 Monster Damage Reduction +10 Max HP +75 Max MP/WP/SP +50 Max Stamina +50 Extra All Special Attack Damage +1% All Resistance +3% Combat/Skill EXP +75% Item Drop Rate +10% |
Primordial – 1 |
| Bonghwang’s Tear | All AP +4 All Accuracy +5 All Damage Reduction +5 All Evasion +7 Max HP +75 Max MP/WP/SP +50 Max Stamina +50 Extra AP Against Monsters +2 Monster Damage Reduction +2 Extra All Special Attack Damage +0.5% Special Attack Evasion Rate +0.5% All Resistance +2% Ignore All Resistance +2% Combat/Skill EXP +30% Item Drop Rate +5% |
Primordial – 1 |
Attack Speed Crystals
| Crystal | Effect | Group |
|---|---|---|
| Glorious Crystal of Gallantry – Ah’krad | All Accuracy +3 Extra Damage to Monsters +7 Attack and Casting Speed +1% |
Ah’krad |
| Ancient Spirit’s Crystal – Viper | Attack Speed +1 Casting Speed +1 |
Ancient Spirit – 1 |
| Black Magic Crystal – Carmae | Critical Hit +1 Attack Speed +1 All AP +2 |
Carmae |
| BON Magic Crystal – Carmae | Critical Hit +2 Attack Speed +1 All AP +3 |
Carmae |
| JIN Magic Crystal – Carmae | Critical Hit +1 Attack Speed +1 All AP +5 |
Carmae |
| WON Magic Crystal – Carmae | Critical Hit +1 Attack Speed +2 All AP +3 |
Carmae |
| Black Magic Crystal – Assault | Attack Speed +2 Grapple Resistance +5% |
Increased Resistance II |
| Time Spirit’s Crystal – Perforation | Ignore All Resistance +5% Attack/Casting Speed +3% (Arena of Solare) |
No Group |
| Ancient Magic Crystal – Carmae | Critical Hit +1 Attack Speed +1 |
No Group |
| Ancient Magic Crystal – Viper | Attack Speed +1 Casting Speed +1 |
No Group |
| Glorious Crystal of Gallantry – Olucas | All Accuracy +3 Extra Damage to Humans +7 Attack and Casting Speed +1% |
Olucas |
| Red Battlefield Crystal: Viper | Attack Speed +1 Casting Speed +1 Extra Damage to Humans +10 |
Red Battlefield I |
| Red Battlefield Crystal: Carmae | Critical Hit +1 Attack Speed +1 Extra Damage to Humans +8 |
Red Battlefield II |
| Black Magic Crystal – Viper | Attack Speed +1 Casting Speed +1 All Accuracy +8 |
Viper |
| BON Magic Crystal – Viper | Attack Speed +2 Casting Speed +1 All Accuracy +12 |
Viper |
| JIN Magic Crystal – Viper | Attack Speed +1 Casting Speed +1 All Accuracy +20 |
Viper |
| WON Magic Crystal – Viper | Attack Speed +1 Casting Speed +2 All Accuracy +12 |
Viper |
Critical Hit Crystals
| Crystal | Effect | Group |
|---|---|---|
| WON Magic Crystal – Carmae | Critical Hit +1 Attack Speed +2 All AP +3 |
Carmae |
| WON Magic Crystal – Addis | Critical Hit +1 Casting Speed +2 All AP +3 |
Addis |
| Ultimate Combined Magic Crystal – Gervish | Combat/Skill EXP +10% Weight Limit +25 LT- 2 crystal set effect Critical Hit +1 Movement Speed +1 Weight Limit +75 LT – 4 crystal set effect |
Ultimate Gervish – 4 |
| Time Spirit’s Crystal – Plunder | All AP +5 Critical Hit Rate +10% (Arena of Solare) |
No Group |
| Red Battlefield Crystal: Carmae | Critical Hit +1 Attack Speed +1 Extra Damage to Humans +8 |
Red Battlefield II |
| Red Battlefield Crystal: Addis | Critical Hit +1 Casting Speed +1 Extra Damage to Humans +8 |
Red Battlefield II |
| JIN Magic Crystal – Carmae | Critical Hit +1 Attack Speed +1 All AP +5 |
Carmae |
| JIN Magic Crystal – Addis | Critical Hit +1 Casting Speed +1 All AP +5 |
Addis |
| HAN Combined Magic Crystal – Gervish | Combat/Skill EXP +1% Weight Limit +15 LT – 2 crystal set effect: Critical Hit +1 Movement Speed +1 Weight Limit +75 LT – 4 crystal set effect: Critical Hit +1 Movement Speed +1 Weight Limit +75 LT Combat EXP +5% Skill EXP +3% |
Gervish |
| Dark Red Fang Crystal – Valor | Critical Hit +2 All AP +5 |
Dark Red Valor |
| Combined Magic Crystal – Gervish | – 2 crystal set effect: Critical Hit +1 Movement Speed +1 Weight Limit +75 LT – 4 crystal set effect: Critical Hit +1 Movement Speed +1 Weight Limit +75 LT Combat EXP +5% Skill EXP +3% |
Gervish |
| BON Magic Crystal – Carmae | Critical Hit +2 Attack Speed +1 All AP +3 |
Carmae |
| BON Magic Crystal – Addis | Critical Hit +2 Casting Speed +1 All AP +3 |
Addis |
| Black Magic Crystal – Valor | Critical Hit +2 Grapple Resistance +5% |
Increased Resistance II |
| Black Magic Crystal – Carmae | Critical Hit +1 Attack Speed +1 All AP +2 |
Carmae |
| Black Magic Crystal – Addis | Critical Hit +1 Casting Speed +1 All AP +2 |
Addis |
| Ancient Spirit’s Crystal – Valor | Critical Hit +1 | Ancient Spirit – 1 |
| Ancient Magic Crystal – Carmae | Critical Hit +1 Attack Speed +1 |
No Group |
| Ancient Magic Crystal – Addis | Critical Hit +1 Casting Speed +1 |
No Group |
Black Magic Crystal Valor
Black Magic Crystal Valor is one of the cheapest crystals to increase Critical Hit level by 2.
Cheap Critical Hit Crystal (Limit 2 Increased Resistance II):
- Black Magic Crystal – Valor → Critical Hit +2
How To Obtain:
- These are usually easy to obtain on the marketplace.
- You have a chance to obtain them from Sealed Black Magic Crystals that drop in most monster zones.
- Centaurus Herd is one of the best grinding spots for Sealed Black Magic Crystals for those with around 180 AP because it has an above average drop rate for them at about 16 per hour.
Outfit Slot Crystals
There are 3 different Outfit Slot Crystals that can be placed in an Outfit Slot, which requires wearing a Socketed Outfit that has been altered by a Black Spirit’s Claw.
 Ancient Spirit’s Crystal – Valor – Critical Hit +1
 Ancient Spirit’s Crystal – Swiftness – Movement Speed +2
 Ancient Spirit’s Crystal – Viper – Attack Speed & Casting Speed +1
Ancient Spirit’s Crystal – Valor 
- Crystal Effect: Critical Hit +1
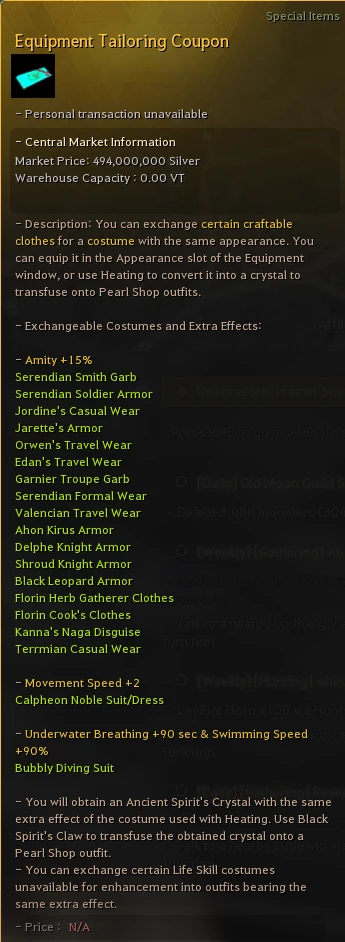
● STEP 1: Combine  Pearl Equipment Tailoring Coupon with one of…
- Serendian Soldier Armor
- Serendian Smith Garb
- Ahon Kirus’s Armor
- Delphe Knight Armor
- Florin Herb Gatherer Clothes
● STEP 2: Processing (L) → Heat the Crafted Costume to obtain Ancient Spirit’s Crystal – Valor ![]()
● STEP 3: line up 3x  Black Spirit’s Claw Piece to create
  Black Spirit’s Claw
● STEP 4: Claw opens 1 socket in the chest piece of a non-functional Pearl Outfit. (Excludes camouflage, cooking, processing, horse, shark, fish, etc)
Life Skill Crystals
Crystals can be equipped to gain more Life Mastery or Life Exp.
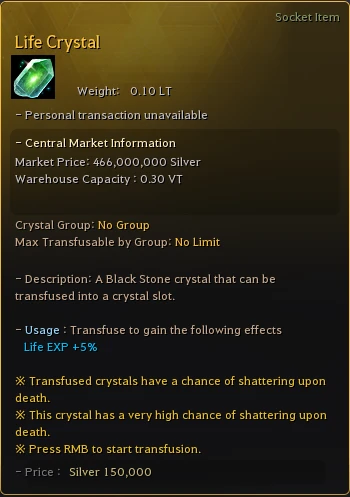
- Life Crystal → Life EXP +5%
- Dawn Crystal (Preonne Required) → Life EXP 4%/8%/15%
- Dim Magic Crystal → Life EXP 3%
- Crystal of Breathing Verdure → Life EXP 7% and Life Mastery +15
- Vital Crystal → Life Mastery +10
NOTE: Life Crystal and Vital Crystal do NOT have a crystal group and have no limit!
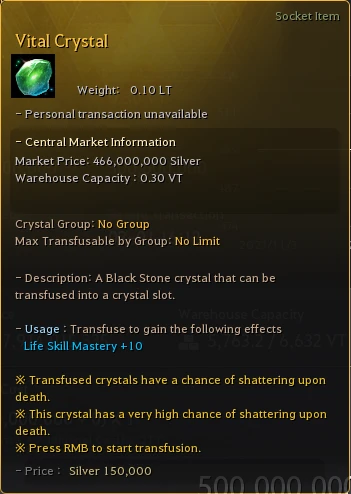
Life Skill Crystal
16 crystal slots:
+80% Life Exp or +160 Life Mastery
Vital Crystal Materials
Vital Crystal that gives Life Mastery +10 can be crafted by processing Forest Crystal with 4 other materials.
Processing (L) → Simple Alchemy:
 – Magical Lightstone Crystal x 100
 – Magical Shard x 50
 – Trace of Nature x 50
 – Forest Crystal x 1
 – Bloody Tree Knot x10
Life Crystal Materials
Life Crystal that gives Life EXP +5% can be crafted by processing Forest Crystal with 4 other materials.
Processing (L) → Simple Alchemy:
 – Magical Lightstone Crystal x 100
 – Magical Shard x 50
 – Trace of Nature x 50
 – Forest Crystal x 1
 – Spirit’s Leaf x10
Forest Crystal
1 Forest Crystal is used to craft 1 Life Skill crystal that buffs +5% Life EXP or +10 Life Mastery.
Obtain Forest Crystal:
- Sniper hunting in Land of the Morning Light – about 1 every 1.5 hours.
- Send worker to Dokkebi Forest node – 1 every 2 to 3 weeks.
- AFK Fishing in Land of the Morning Light – 1 every week.
- Special Barter – is this real? Not in my experience, but I have proof it exists.
- Exchange 1000 Sangpyeong Coin to Hyunyong in Moodle Village.
Magical Lightstone Crystal
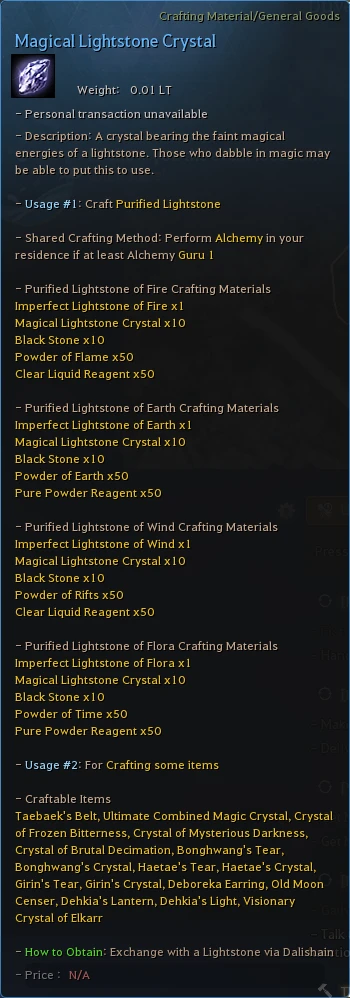
100 Magical Lightstone Crystal is also required to craft a Life Exp or Mastery Crystal.
Obtain Magical Lightstone Crystal:
- Exchange Imperfect Lightstones or Lightstones you no longer need to Dalishain the Wandering Alchemist.
HP and Defense Crystals
You could also slot crystals that will help you survive since hunting can feel quite deadly.
There are many crystals that can buff Max HP.
Cheapest HP Crystal on the Marketplace:
- Black Magic Crystal – Vigor – Max HP +50
More Expense But Much Better Stats:
- Black Magic Crystal – Cobelinus
- Max HP +100
Weight Limit +20LT
All Damage Reduction +2
- Max HP +100
I really like the Black Magic Crystal – Cobelinus for added DP and Weight Limit. It adds more bang for your buck. And it’s not so expensive that you would cry too long for losing it on death.
Kydict’s Crystals are given away for events and Season reward, but you may not want to wear them since they can shatter on death and are not easily replaceable.
Hunting Artifacts & Lightstones
There are many Lighstone combinations that can help hunting.
Canine Tooth is the most famous:
[Canine Tooth Effects] (with Lighstone Effects added)
Critical Hit Rate +8%
Hunting EXP +13%
Hunting Mastery +25
Attack Speed Level +2
Critical Hit +2
![]() Lighstone of Flora: Trap
Lighstone of Flora: Trap![]() Lighstone of Flora: Track
Lighstone of Flora: Track![]() Lighstone of Fire: Claws
Lighstone of Fire: Claws![]() Iridescent Lightstone
Iridescent Lightstone
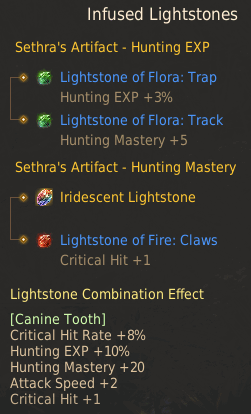
Hunting Artifacts:
![]() Sethra’s Artifact – Life EXP → +3%
Sethra’s Artifact – Life EXP → +3%
![]() Sethra’s Artifact – Life Skill Mastery → +7
Sethra’s Artifact – Life Skill Mastery → +7
![]() Sethra’s Artifact – Hunting EXP → +5%
Sethra’s Artifact – Hunting EXP → +5%
![]() Sethra’s Artifact – Hunting Mastery → +10
Sethra’s Artifact – Hunting Mastery → +10
Legendary Marksman
Another strong hunting combo would be Legendary Marksman for an additional 45 Hunting Mastery.
![]() Lighstone of Flora: Track
Lighstone of Flora: Track![]() Lighstone of Flora: Track
Lighstone of Flora: Track![]() Lighstone of Flora: Track
Lighstone of Flora: Track![]() Iridescent Lightstone
Iridescent Lightstone
Hunting Lightstone Combo List:
| Lightstones | Combo + Lightstone Effects |
|---|---|
| Flora: Trap Flora: Trap Wind: Mind Iridescent Lightstone |
[Choice and Focus: Hunting] Hunting Mastery -500 Hunting EXP +41% Max MP +50 |
| Flora: Trap Flora: Trap Flora: Trap Iridescent Lightstone |
[Hunter’s Instinct] Hunting EXP +25% |
| Flora: Trap Flora: Trap Flora: Trap Flora: Trap |
[Eye of the Hawk] Hunting EXP +20% |
| Flora: Trap Flora: Trap Flora: Trap – |
[Sculpture] Hunting EXP +14% |
| Flora: Trap Flora: Track Fire: Claws Iridescent Lightstone |
[Canine Tooth] Critical Strike Chance +8% Hunting EXP +13% Hunting Mastery +25 Attack Speed Level +2 Critical Strike Level +2 |
| Flora: Trap Flora: Track Fire: Zeal Iridescent Lightstone |
[Blink of an Eye] Matchlock Reload Speed +10% Hunting EXP +13% Hunting Mastery +25 Attack Speed Level +2 Critical Strike Level +2 |
| Flora: Trap Flora: Track Fire: Zeal Fire: Claws |
[Crouching Predator] Hunting EXP +10% Hunting Mastery +20 Attack Speed Level +2 Critical Strike Level +2 |
| Flora: Track Flora: Track Flora: Track – |
[First Shot of Dawn] Hunting Mastery +23 |
| Flora: Track Flora: Track Flora: Track Flora: Track |
[Closed Snare] Hunting Mastery +35 |
| Flora: Track Flora: Track Flora: Track Iridescent Lightstone |
[Legendary Marksman] Hunting Mastery +45 |
| Flora: Wildlife Flora: Wildlife Wind: Fortune Iridescent Lightstone |
[Delotia] Life EXP +23% Luck Level +1 |
| Flora: Wildlife Flora: Paradise Wind: Fortune Iridescent Lightstone |
[Fortress of Nature] Life EXP +15% Life Mastery +25 Luck Level +1 |
| Flora: Paradise Flora: Paradise Wind: Fortune Iridescent Lightstone |
[Hand of Manos] Life Mastery +40 Luck Level +1 |
Easy Buff Option
Crystals make some of the following items not necessary, but you may be interested if the market changes.
TOTAL HUNTING BUFFS:
- Attack Speed: +5
- Attack Speed: +4%
- Critical Hit: +5
- Hunting Exp: +25%
- Gathering: +2
- Movement Speed: +2
- Life Skill Mastery: +25
- Max HP: +300
| Hunting Item | Hunting Buffs | Obtain |
|---|---|---|
[Honor] Outfits |
Attack Speed +2 | main quest reward |
Elixir of Flowing Wind |
Attack Speed +3 | Alchemy (Professional 1) Wise Man’s Blood x1 Fortune Teller Mushroom x5 Powder of Darkness x2 Pine Sap x5 |
Seafood Cron Meal |
Life EXP +10% Gathering +2 Movement Speed +2 Weight Limit +100LT Life Skill Mastery +25 |
Simple Cooking Balenos Meal x3 Sute Tea x3 Savory Steak x1 Ancient Cron Spice x1 or Balenos Meal x3 Calpheon Meal x3 Margoria Seafood Meal x1 Ancient Cron Spice x1 |
Elixir of Flowing Time |
Life EXP +15% | Alchemy (Professional 1) Wise Man’s Blood x1 Fire Flake Flower x6 Powder of Time x2 Maple Sap x5 |
Spirit Perfume Elixir |
MAX HP +300 Critical Hit Rate +5 |
Alchemy (Skilled 1) Loopy Tree Sap x10 Fruit of Nature x1 Violet Flower x2 Powder of Darkness x10 Dead Tree Essence x1 |
Destruction Spirit Stone |
Attack Speed +4% | mob drop in Kamaslyvia |
High Exp Consumables
This option has the best hunting exp buffs, but can be more difficult and expensive to obtain. Again, crystals can make some of the following items not necessary, but you may be interested if the market changes.
TOTAL HUNTING BUFFS:
- Attack Speed: +5
- Attack Speed: +4%
- Critical Hit: +5
- Hunting Exp: +35%
- Gathering: +5
- Movement Speed: +5
- Max HP: +150
- Back Attack Damage: +5%
| Hunting Item | Hunting Buffs | Obtain |
|---|---|---|
Exquisite Cron Meal |
Attack Speed +2 Movement Speed +2 Critical Hit +2 Max HP +150 Max Stamina +200 Back Attack Damage +5% All Resistance +4% |
Simple Cooking Serendia Meal x1 Special Arehaza Meal x3 Kamasylvia Meal x3 Ancient Cron Spice x1 |
Destruction Spirit Stone |
Attack Speed +4% | mob drop in Kamaslyvia |
Perfume of Swiftness |
Weight Limit +200LT Life EXP +20% Movement Speed +5 Gathering Speed +5 |
Alchemy (Skilled 1) Blue Whale Oil x1 Powder of Time x4 Everlasting Herb x6 Purified Water x4 Clear Liquid Reagent x2 |
Elixir of Flowing Wind |
Attack Speed +3 | Alchemy (Professional 1) Wise Man’s Blood x1 Fortune Teller Mushroom x5 Powder of Darkness x2 Pine Sap x5 |
Elixir of Flowing Time |
Life EXP +15% | Alchemy (Professional 1) Wise Man’s Blood x1 Fire Flake Flower x6 Powder of Time x2 Maple Sap x5 |
Elixir of Strong Shock |
Critical Hit +3 | Alchemy (Professional 1) Blood of Clown x1 Tiger Mushroom x5 Powder of Time x3 Cedar Tree Sap x7 |
Cheap Consumables
Just has the bare essentials for hunting, but most are not needed if you use crystals.
TOTAL HUNTING BUFFS:
- Attack Speed: +5
- Critical Hit: +5
- Hunting Exp: +25%
- Gathering: +2
- Max HP: +300
| Hunting Item | Hunting Buffs | Obtain |
|---|---|---|
Pan-Fried Oyster |
Attack Speed +2 Stun/Stiffness/Freezing Resistance +10% |
Cooking (Skilled 1) Oyster x3 Egg x2 Wheat Flour x5 Vinegar x2 Olive Oil x3 |
Whale Meat Salad |
Life EXP +10% | Cooking (Skilled 1) Blue Whale Meat x1 Egg x3 Cabbage x6 Pepper x4 Dressing x2 |
Life Spirit Stone |
Gathering +2 | mob drop in Kamaslyvia |
Spirit Perfume Elixir |
MAX HP +300 Critical Hit Rate +5 |
Alchemy (Skilled 1) Loopy Tree Sap x10 Fruit of Nature x1 Violet Flower x2 Powder of Darkness x10 Dead Tree Essence x1 |
Elixir of Flowing Wind |
Attack Speed +3 | Alchemy (Professional 1) Wise Man’s Blood x1 Fortune Teller Mushroom x5 Powder of Darkness x2 Pine Sap x5 |
Elixir of Flowing Time |
Life EXP +15% | Alchemy (Professional 1) Wise Man’s Blood x1 Fire Flake Flower x6 Powder of Time x2 Maple Sap x5 |
Hunting Life Mastery Clothes
Manos Life Mastery Clothes are the best option, but may be too expensive for beginners.
Hunting Mastery is very important to the Hunting Life Skill because it can increase blood, meat, and hide up to 375%.
| Hunting Clothes | Hunting Buffs | Obtained By | |
|---|---|---|---|
| Loggia Hunter’s Clothes (up to +20 enhancement) |
DP: 6 to 264 Hunting Mastery +3 to +280 Movement Speed +1 to +2 Hunting Exp: 3% to 28% |
1 mil silver at Camellia Loggia or Zaaira | |
| Robeau Hunter’s Clothes (up to +20 enhancement) |
DP: 11 to 269 Hunting Mastery +4 to +330 Movement Speed +1 to +2 Hunting Exp: 4% to 33% |
10 mil silver at Geranoa and Zaaira | |
| Manos Hunter’s Clothes (up to +20 enhancement) |
DP: 21 to 279 Hunting Mastery +5 to +400 Movement Speed +1 to +3 Hunting EXP +5% to +40% |
Processing (L) > Manufacture
|
Hunting Mastery Clothes use armor, gloves, shoes, and helmet slots, but it’s mostly safe because they have DP! 🙂
Please visit the Hunting Mastery Guide for more details.
Mastery Clothes Life Exp Chart
Hunting Mastery Clothes give Life Exp up to 40%.
| Manos Equipment Manos Hunter’s Clothes |
Blue Equipment Robeau Hunter’s Clothes |
Green Equipment Loggia Hunter’s Clothes |
|||
|---|---|---|---|---|---|
| Enhancement Level | Life EXP Gain (%) | Enhancement Level | Life EXP Gain (%) | Enhancement Level | Life EXP Gain (%) |
|
+0
|
5 |
+0
|
4 |
+0
|
3 |
| +1 | 5 | +1 | 4 | +1 | 3 |
| +2 | 5 | +2 | 4 | +2 | 3 |
| +3 | 5 | +3 | 4 | +3 | 3 |
| +4 | 10 | +4 | 8 | +4 | 6 |
| +5 | 10 | +5 | 8 | +5 | 6 |
| +6 | 10 | +6 | 8 | +6 | 6 |
| +7 | 10 | +7 | 8 | +7 | 6 |
| +8 | 10 | +8 | 8 | +8 | 6 |
| +9 | 10 | +9 | 8 | +9 | 6 |
| +10 | 10 | +10 | 8 | +10 | 6 |
| +11 | 15 | +11 | 12 | +11 | 9 |
| +12 | 15 | +12 | 12 | +12 | 9 |
| +13 | 15 | +13 | 12 | +13 | 9 |
| +14 | 15 | +14 | 12 | +14 | 9 |
| +15 | 15 | +15 | 12 | +15 | 9 |
| PRI (I) | 20 | PRI (I) | 16 | PRI (I) | 12 |
| DUO (II) | 20 | DUO (II) | 16 | DUO (II) | 12 |
| TRI (III) | 25 | TRI (III) | 20 | TRI (III) | 15 |
| TET (IV) | 30 | TET (IV) | 25 | TET (IV) | 20 |
| PEN (V) | 40 | PEN (V) | 33 | PEN (V) | 28 |
Hunting Bag
Hunting Bag can be worn in the tool slot to increase Hunting Mastery, Hunting EXP, and Weight Limit.
| Hunting Clothes | Hunting Buffs | Obtained By | |
|---|---|---|---|
| Loggia Hunting Bag (up to +20 enhancement) |
Hunting Mastery +3 to +280 Hunting EXP +10% Weight Limit +30LT |
1 mil silver at Camellia Loggia or Zaaira | |
| Robeau Hunting Bag (up to +20 enhancement) |
Hunting Mastery +4 to +330 Hunting EXP +20% Weight Limit +50LT |
10 mil silver at Geranoa and Zaaira | |
| Manos Hunting Bag (up to +20 enhancement) |
Hunting Mastery +5 to +400 Hunting EXP +30% Weight Limit +100LT |
Processing (L) > Manufacture
|
Hunter’s Clothes Costume
Hunter’s Clothes can be tailored into a costume that will equip into your Appearance slots.
You can try to wear them without tailoring, but they have no DP!
- No DP = pot happy but sad, or possibly dead hunters.
Hunter’s Clothes are obtained as a Challenge Reward (Y) for getting Artisan Hunting level. If you lost yours, you can buy it for 1.5 mil silver at a <Luxury Vendor> NPC in every major city.
![]() Hunter’s Clothes:
Hunter’s Clothes:
- Hunting EXP +10%
- Vision Range +10m
- Fall Damage -50%
Requirements:
- Skilled 10 Hunting in order to equip.
- Equipment Tailoring Coupon from Pearl Shop (1,500 Pearls)
Hunter’s are prone to falling while screaming wildly from the wilds, so Hunter’s Clothes is extremely necessary! 😀
Hunting with Alchemy Stones
Alchemy Stones like Khan’s Heart can be used.
| Hunting Item | Hunting Buffs | Obtained By | |
|---|---|---|---|
| Alchemy Stone of Life | Gathering +1 to +3 Gathering Item Drop 0% to 20% Weight Limit: 0 to 75LT |
Alchemy (Skilled 5) Shining Powder x8 Sinner’s Blood x5 Powder of Time x6 Pure Powdered Reagent x9 Clear Liquid Reagent x9 |
|
| Alchemy Stone of Destruction | Attack Speed 0 to +10% | Alchemy (Skilled 5) Shining Powder x8 Sinner’s Blood x5 Powder of Time x6 Pure Powdered Reagent x9 Clear Liquid Reagent x9 |
|
| Khan’s Heart (Life) | Gathering +2 Life Mastery +25 Weight Limit: +70LT Gathering Item Drop Rate +12% |
world boss drop and barter |
|
 |
Treant’s Tear | Life EXP +30% Weight Limit +50 Gathering +2 Gathering Item Drop Rate +10% |
Season reward |
| [Event] Stella’s Spirit Stone | Gathering Speed +2 Gathering Item Drop Rate +10% Weight Limit +60 LT Life Skill Mastery +100 |
Event Reward | |
| [Event] Tachros’ Spirit Stone | Attack Speed +4% Weight Limit +50 LT |
Event Reward |
Hunting Pets
Hedgehog or Pwudgy Llama should be your first priority.
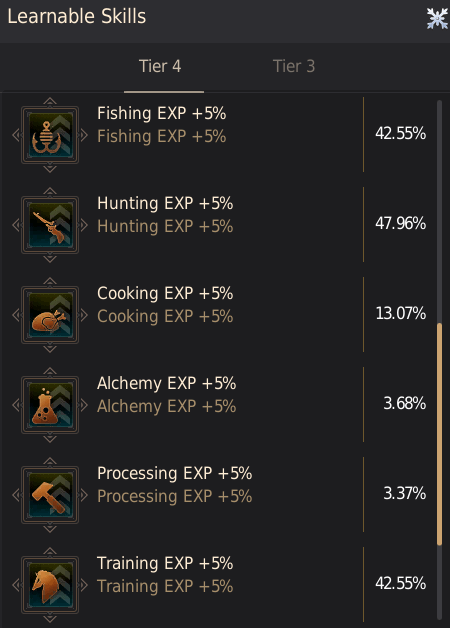
Unfortunately, they only have a 14.7% chance to learn Hunting Exp +5%. 5 other skills have a much higher chance.
Most bird pets have a higher chance of learning Hunting Exp +5%. (Thanks bdolytics.com!)
Bos’n Jak is an example of one pet that has a 48% chance to learn +5% Hunting EXP.
![]()
![]() Bos’n Jack
Bos’n Jack
- Pet Type: RARE
- Talent: +50LT Big Ship Weight each Tier
- Special Skill: Auto-Fishing Time Reduction
- 5x T4 Bos’n Jack = 1,000 LT
- Increased Chances to Learn these Skills:
- Fishing Exp +5%
- Hunting Exp +5%
- Training Exp +5%
- Trading Exp +5%
- Karma Recovery +5%
![]()
![]() Jojo
Jojo
- Pet Type: RARE
- Talent: +1% Life EXP each tier
- Special Skill: Hostility Detection
- Increased Chances to Learn these Skills:
- Fishing Exp +5%
- Hunting Exp +5%
- Training Exp +5%
- Trading Exp +5%
- Karma Recovery +5%
Jojo is one of the best pets to purchase for hunters.


Scarlet Macaw, Long-tailed Rosefinch, Sky Hawk, Carmadun Owl, and Brown Guide Hawk are common in the Pearl Shop. The others are offered seasonally.
WARNING: Not all birds have these skill learn chances. For example, Emperor Hawk does NOT appear to have the same chance to obtain hunting exp.
Pets with Life Skill Exp Talents:
Phoniel Squirrel, Choppy, Hedgehog, Penguin, Marmot, Shadow Wolf, Little Lamb, Otter, Ferret, Flondor Duck, Panda (not red), Jojo, Newborn Crimson Dragon, Newborn Golden Dragon, most cat pets, etc (900+ Pearls)
- 1% Life EXP per Tier (up to +20% for 5 pets)
- all pets have RNG chance to learn +5% Hunting EXP (up to +25% for 5 pets)
Classic cats don’t appear to have a high chance of learning Hunting Exp +5% skill.
Most Classic Cat Skill Learning Chances:
 Processing EXP → 43.79%
 Alchemy EXP → 42.76%
 Karma Recovery → 40.39%
 Cooking EXP → 38.42%
 Fishing EXP → 38.29%
 Farming EXP → 38.29%
Hunting Exp Gear
Life Exp helps you level Hunting faster.
The most common Life Skill items are +50% Life Exp Scrolls and Book of Life purchased from the Pearl Shop.
But there are many other ways to boost Life Exp.
See → Life Skill Equipment & Buffs.

Hunting Mastery Accessories
Hunting Mastery can be increased by wearing Life Mastery jewelry that also boosts your Hunting Exp.
- Life Mastery Jewelry Accessories:
- Loggia: +21% Life EXP, +208 Life Mastery (full set of 6 TET) Loggia Guide
- Geranoa: +35.5% Life EXP, +350 Life Mastery (full set of 6 TET)
- Manos: +65% Life EXP, +570 Life Mastery (full set of 6 TET) Manos Accessories Guide
- Preonne: +98% Life EXP, +1100 Life Mastery (full set of 6 IX)
| Life Mastery Necklace Buffs | |||
|---|---|---|---|
|
Lv
|
Loggia
|
Geranoa
|
Manos |
|
Base
|
Life Mastery +5 Life EXP +1% |
Life Mastery +8 Life EXP +1% |
Life Mastery +15 Life EXP +2% |
|
PRI
|
Life Mastery +10 Life EXP +1% |
Life Mastery +14 Life EXP +2% |
Life Mastery +30 Life EXP +4% |
|
DUO
|
Life Mastery +18 Life EXP +2% |
Life Mastery +26 Life EXP +3% |
Life Mastery +50 Life EXP +6% |
|
TRI
|
Life Mastery +28 Life EXP +2% |
Life Mastery +45 Life EXP +4% |
Life Mastery +75 Life EXP +8% |
|
TET
|
Life Mastery +40 Life EXP +3% |
Life Mastery +70 Life EXP +5% |
Life Mastery +105 Life EXP +10% |
|
PEN
|
Life Mastery +60 Life EXP +3% |
Life Mastery +110 Life EXP +6% |
Life Mastery +150 Life EXP +12% |
| Life Mastery Rings and Earrings Buffs | |||
|---|---|---|---|
|
Lv
|
Loggia
|
Geranoa
|
Manos |
|
Base
|
Life Mastery +4 Life EXP +1% |
Life Mastery +6 Life EXP +1% |
Life Mastery +10 Life EXP +2% |
|
PRI
|
Life Mastery +8 Life EXP +1% |
Life Mastery +12 Life EXP +2% |
Life Mastery +25 Life EXP +4% |
|
DUO
|
Life Mastery +16 Life EXP +2% |
Life Mastery +22 Life EXP +3% |
Life Mastery +40 Life EXP +6% |
|
TRI
|
Life Mastery +24 Life EXP +2% |
Life Mastery +36 Life EXP +4% |
Life Mastery +65 Life EXP +8% |
|
TET
|
Life Mastery +32 Life EXP +3% |
Life Mastery +55 Life EXP +5% |
Life Mastery +90 Life EXP +10% |
|
PEN
|
Life Mastery +50 Life EXP +3% |
Life Mastery +95 Life EXP +6% |
Life Mastery +125 Life EXP +12% |
What is the Best Class for Hunting?
Some classes have better Attack Speed, Critical Hit Chance, and Critical Damage, which are beneficial for hunting.
For example, Shai has Sun, Moon, Stars which buffs Attack/Casting/Movement Speed +10% for 60 sec (Applied to self and allies). But you have to swap weapons to cast it.
There is some debate over how much advantage class gives. Some say it’s significant enough to switch characters and others say it’s a minor benefit.
GPW’s Top Rankings for Hunting Kill Speed
Thanks GPW for all the excellent, stupendous, hard work! View source.
| Class | Tier | Awakening |
|---|---|---|
| Warrior | A- | 10% Attack Speed |
| Tamer (Selfbuff) | B+ | 16% uptime (20% AS 60% Crit%) |
| Musa | B- | 5% Crit Chance |
| Maehwa | B- | 5% Crit Chance |
| Ninja | A- | 10% Attack Speed |
| Kunoichi | A- | 10% Attack Speed |
| Dark Knight | B- | 10% Crit Dmg |
| Striker | S- | 20% Crit Chance |
| Mystic | S- | 20% Crit Chance |
| Lahn | A- | 10% Attack Speed |
| Shaï (Selfbuff) | A+ | 100% uptime Selfbuff (25% AS) |
| Guardian | B- | 10% Crit Dmg |
| Hashashin | A- | 10% Attack Speed |
| Drakania | B- | 10% Crit Dmg |
All classes not listed are rank C.
| Class | Tier | Succession |
|---|---|---|
| Berserker | B- | 4% Crit Chance |
| Tamer (SelfBuff) | B+ | 16% uptime Selfbuff (20% AS 60% Crit%) |
| Musa | A | 15% Crit Chance |
| Maehwa | B- | 5% Crit Chance |
| Wizard | B- | 4% Crit Chance |
| Witch | B- | 4% Crit Chance |
| Ninja | A+ | 13% Attack Speed |
| Kunoichi | A+ | 10% Attack Speed 5% Crit Chance |
| Dark Knight | B- | 10% Crit Dmg |
| Striker | S+ | 25% Crit Chance |
| Mystic | S | 2% Attack Speed 20% Crit Chance |
| Lahn | A- | 10% Attack Speed |
| Shaï (Selfbuff) | A+ | 100% uptime Selfbuff (25% AS) |
| Guardian | A | 10% Crit Chance 10% Crit Dmg |
| Hashashin | A- | 10% Attack Speed |
| Drakania | B- | 10% Crit Dmg |
Top 5 for Hunting Life Skill
- Striker Succession
- Mystic Succession
- Striker/Mystic Awakening
- Kunoichi/Ninja Succession
- Shai
Hunting Location Maps for Wild Mobs
The developers keep adding wild hunting locations. There are maps that can help you find the animals you want to hunt.
- Thanks to GPW for the spreadsheet of maps
- https://imgur.com/a/Tf2t3MW (Not sure who created these. Let me know!)
- Thanks to Hinfrem & Ropic’s for this Main Continent Hunting Map
- GrumpyG’s Balenos Islands Hunting Map.
- GrumpyG’s Wild Rare Hunting Mobs
Which Hunting Mob and Location is Best?
Each wild hunting mob has a unique drop rate for enhancement materials, meat, blood, hides, etc.
Thanks GPW for the helpful spreadsheet used as a source for the drop rate charts below.
Best Hunting Mobs for Enhancement Mats
Hunting is a fun way to obtain enhancement items for both Manos and normal gear.
Grass Rhino located at Narcion is the best hunting mob in order to obtain enhancement items like Caphras Stone, Sharp Crystal Shard, and Black Gems.
Grass Rhino is also the best mob to obtain hunting EXP.
NOTE: 1 Wildspark can be exchanged for 1 Black Gem Fragment. Shadow Wolves in Narcion has a very high drop rate for them.
| Enhancement Item | Grass Rhino | Shadow Lion | Shadow Wolf | Verdure Buck | Frost Wolf | Snowfiled Yak | Feather Wolf |
|---|---|---|---|---|---|---|---|
| Sharp Black Crystal Shard | 44 | 35 | 12 | 11 | 6 | 3 | 23 |
| Black Gem Fragment | 70.2 | 28 | 7 | 6.4 | 16.6 | 11.6 | 10.5 |
| Black Gem | 26.3 | 14 | 2.3 | 2.1 | 4.6 | 4.3 | 3.5 |
| Concentrated Magical Black Gem | 1.8 | 2.1 | 0.2 | 0.2 | 0.4 | 0 | 0.4 |
| Caphras Stone | 46.6 | 38.5 | 31.6 | 17 | 30.1 | 10.8 | 24.5 |
| Stuffed Furniture | 2.6 | 2.1 | 1.6 | 1.2 | 10.6 | 3.6 | 10 |
| Breath of Narcion/Omua | 2.3 | 1.4 | 1.5 | 1.1 | 1.2 | 0.3 | – |
| Wildspark | 181.6 | 145.3 | 472.2 | 435.8 | 414.0 | 181.6 | 348.7 |
Best Hunting Mobs for Meat
The best mob to hunt for meat is Shadow Wolves located in Narcion.
| Hunting Mob | Kills/Hr | Meat |
|---|---|---|
| Shadow Wolves | 650 | 19,876.70 |
| Frost Wolves | 570 | 19,317.80 |
| Verdure Bucks | 600 | 18,135.90 |
| Llama | 500 | 11,995.80 |
| Feather Wolves | 480 | 11,612.00 |
| Grass Rhino | 250 | 7,923.30 |
| Snowfield Yak | 250 | 7,438.10 |
| Shadow Lion | 200 | 6,831.70 |
| Giant Lions | 250 | 6,747.70 |
Beginner Hunting Questline
Huge thank you to PolarVortex (discord PulloutRoulette#9422) for doing a runthrough of the questline and providing pictures along the way. And also Eminent! (Originally written by Eminent (u/CadeGuitar), who generously published a Hunting Life Skill Guide in “Eminent’s Life Skill Guide“.)
Level 20+ (Turn on All Quests (O key))
Hunting in the Forest of Seclusion
Requirements:
- 40 Amity with Hessenvale
- 2 Contribution Points

Hessenvale is the general goods vendor in the western guard camp. Make sure you rent a practice matchlock for 2 CP from her before you move on to the quest location.
At the location marked on your map, look for owls in the trees and SHOOT THEM DOWN.

If you’re having trouble getting a hit, go back over the hunting mechanics section and make sure you’re doing it all right. If you are, it should be a piece of cake.
Requirements:
- 10 Amity with Alfredo
- Beginner 5 gathering

If you don’t have beginner 5 gathering just buy some empty bottles from a material vendor and gather river water. It should take like 2 minutes.
Start the quest by talking to Alfredo and he’ll lead you to Daphne DelLucci.

Requirements:
- Finished Daphne’s Matchlock

Start the quest by talking to Daphne. She wants you to shoot down 3 wooden beehives. Make sure you rent a practice matchlock from her for 2 CP.

After finishing the quest, return the practice matchlock and then rent it again (this will recover the durability of the gun so you can use it for the next quest)
Requirements:
- Must have a practice matchlock in your inventory
Start this quest by talking to Crio on the Velia docks. He has something against seagulls so he wants you to shoot them down from the sky.
There are plenty of seagulls in the area, the difficulty is finding ones that are in range. I recommend standing on the roof of the building by the banker (go around the back to climb up easy) for an easy shot.

Remember you can only hit the seagulls when your crosshair is red. Crouching to increase your range could be a help here.
It’s important to note that birds can ONLY be damaged by the practice matchlock. My first time doing this quest I spent 20 minutes trying to kill it with a regular gun like a dumbass.
Patch Notes – January 30th 2019: Your character can now use either a Practice Matchlock (which can be rented with Contribution Points) or a Hunting Matchlock to kill seagulls. Additional seagulls have been added to Velia.
The Cat that Swallowed the Canary
Requirements:
- Level 15+
This quest doesn’t give hunting xp but it’s required to do the next quest.
The start NPC is “Villager” who lives on an unmarked farm near Heidel.

To complete the quest simply walk over to one of the scarecrows that are 2 feet away from him, press R, and you’re done.

Requirements:
- Finished The Cat that Swallowed the Canary
This quest is extremely similar to the seagull quest from before.
The start NPC is the same villager from the farm. If your practice matchlock is out of durability, you can return it to him and rent another one.
Climb up onto the roof of his farmhouse and take aim at a bird. Like the seagull quest, they can only be damaged by a practice matchlock. With your experience you should be an expert at bird hunting and this should be a piece of cake for you.

When you’re done return the matchlock to him.
Requirements:
- Level 30+
- Must not have a practice matchlock
You get this quest from Daphne, and, very similar to last time, you have to shoot beehives. After you accept the quest rent the practice matchlock from Daphne.
Follow the same steps from the previous beehive quest.
Return the practice matchlock to Daphne and rent it again to recover the durability. You will need the gun one more time for the jellyfish quest, but until then you will use the beginner matchlock that she gives you as a reward for finishing this quest.
If you are beginner10 hunting by this point, you should buy an Apprentice Matchlock and upgrade it (using weapon stones) to +3 or +4. This will make future quests must easier.
Requirements:
- Finished Shoot and Help
This quest is important because it unlocks one of the better hunting dailies.
After completing shoot and help, talk to Daphne again to get this quest. She’ll ask you to find Chuck Laurie, who might have gotten lost in the Balenos mountains.
Head to the inn in Velia and look for a black-robed man. Talk to him and he will lead you to Chuck (he’ll mark your map).

Once you find him the quest will be complete and the daily will be unlocked.
Chuck Laurie gives 4 daily quests, which give a huge chunk of hunting xp. They are absolutely recommended to level hunting quickly and easily.

He will always be in the same location, but he’ll never be marked on the map.
Before moving on to the next quest in the chain you should do the dailies he offers. See the “hunting dailies” section below for a guide on those.
Requirements:
After you finish the dailies from Chuck Laurie, he’ll give you a quest to find his brother, Leo.

Go to his brother in North Kaia lake (map below) to complete the quest. This will unlock the crocodile daily. You should probably do it while you’re there.
Requirements:
- Level 50+
Start this quest by talking to Merio, who is just east of North Kaia lake.

Like Crio, he has something against a random animal (maybe it’s an otter thing), so he wants you to kill some jellyfish in the lake.
Just like birds, jellyfish can only be killed with a practice matchlock. If you didn’t keep yours from earlier you can rent one from Merio.
Head over to the lake, kill some jellyfish, and you’re done.

Hunting Dailies (Repeatable Daily Quests for Hunting Skill XP)
Fly Like a Butterfly, Sting Like a Bee!
Requirements:
- Finished Hunting-Loving Hunter

The first daily is located on the mountain just south of Olvia. There isn’t really anything to guide you there, so you just have to know where he is.

I like to park my horse next to him. I’m like 60% sure that if you park your horse too close to the Witch Deer it will scare the deer away and you’ll have to chase it down (I could be wrong about that, but there’s no harm in parking your horse away from it).
First, Chuck Laurie will ask you for 10 weeds. Just gather some of the random plants next to him, or do a farm run before you start this daily.
After you give him the weeds he lures out the Witch Deer for you to hunt. Hop on the rock next to him and crouch to shoot it.

If you try to shoot the deer (from any location) without crouching you’re gonna have a very hard time. It will run away by the time you ever get in range which makes this a very frustrating quest. You just have to learn the spots to stand and crouch in order to not scare it away.
This quest (as awful as it might be) is helpful in getting used to the range of your gun.
Requirements:
- Level 30+

Grab this quest at the same time as the witch deer quest. After you kill the deer you need to kill 5 giant elk. The giant elk roam those mountains, so you can probably just kill them as you’re chasing the witch deer around.
You technically don’t need to gather from them to complete the quest. However, the crocodile daily (that you do right after this) requires 5 deer meat to use as bait. Therefore it’s highly recommended to gather from the deer after killing them.
Requirements:
- Finished Easy Game

After turning in the “Easy Game” quest, you get the request to kill 2 Giant Boars. The location for the Giant Boars is marked on your map.
While it’s also not mandatory to gather from them after killing them (and you don’t need their meat for any quest), they do give a chunk of xp (more than the elk) so it’s worthwhile to do so.
Requirements:
- Level 50+
- Finished The Reckless One
The final quest you get from Chuck Laurie is to kill a Giant Brown Bear. The location for the bear is marked on your map (although it’s not the only bear on the mountain).

If you’re not careful about the fight things could go terribly wrong and it will just straight up kill you.
I like to start the fight from the top of this rock. Having the high ground means nothing can block the path of the bullet, and you should be able to get 2 clean shots off.
After your first 2 shots the bear will start charging at you, and you’ll be stuck doing a ridiculously long reload animation. Lucky for you the bear is slow.
Right as you finish reloading the bear should be in the middle of its attack animation, and you have just enough time to do a dodge roll out of the way and avoid the damage.
After rolling immediately shoot 2 more times and repeat the process. Just dodge roll and shoot as fast as possible to avoid all the damage you can.
If you don’t mess up it’s possible to hunt bears without taking any damage at all. However, if you’re still getting used to it you should wear your combat gear in order to tank the damage easier.
Once you get better (and get skilled 10 hunting) you can wear Hunter’s Clothes instead of armor to get a little bit of extra xp.
PLEASE NOTE: After doing this quest, you can skip to the Balenos Islands hunting quest line if you like. This will open up many repeatable hunting quests as well as two daily boss scroll quests. View the Balenos Islands Hunting Guide.
Requirements:
- Finished Brothers at Lake Kaia
Lastly you head to northern lake kaia (just southwest of calpheon). Leo Laurie will be on a small island in the middle of the lake.
If you have a shark outfit this is the time to use it. It’s not a “must have” but it will speed things up a bit.


Give Leo the 5 deer meat that you got from the daily you did earlier. This will bait out the Bull Gator (which is basically identical to the crocodiles just bigger).
Kill it, swim over to it, and butcher it for some meat. Give the meat to Leo and you’re done.
If you have a hedgehog it’s possible to get 2 bull gator meat. It’s pretty much useless and you can just throw it away.
After doing the quest you should kill the crocodiles in the lake. If they’re all there there should be 3 of them. Each one gives a hefty sum of xp, as well as a generous drop table.
After doing the daily, check the north part of the lake for an Everlasting Herb which you’ll be glad to have if you hunt whales in the future. Everlasting Herb, along with Blue Whale Oil, is used in alchemy to produce Perfume of Swiftness.
In addition, if you check the map you’ll notice that kaia lake is separated into 2 lakes. The quest takes place in the northern lake, but the southern lake also has an additional 4 crocodiles, so you should kill those too.
After killing out both lakes, hop servers and do the same thing.
Crocodiles have a 1 hour respawn time, and they’re also extremely contested. They are very desirable because of the quick and easy hunting xp (which is hard to come by).
You won’t always be able to get 2 full servers of crocodiles, but it’s definitely worth a try.
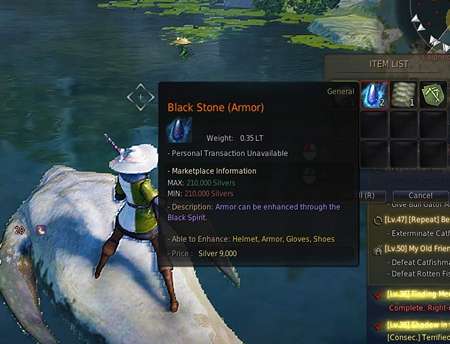
Crocodiles have a generous drop rate of Magic Crystals and Black Stones, which I always grind into Black Stone Powder.
They also have a chance of dropping Hard/Sharp Shards (which I don’t grind).
Finally, they drop crocodile meat, which is the rare ingredient in [Hunter’s Salad] which is a necessary food when hunting Khalk or blue whales.
The following data is connected to my own spreadsheet where I keep track of my daily crocodile kills. The average Black Stone Powder and profit is per run (once a day).
- Kills: 167
- Average Black Stone Powder: 411.40
Your profits could be higher if you didn’t grind your gems and Black Stones, but the Black Stone Powder is more valuable to me.
Technically the 2 seagull quests are also dailies, but they aren’t worth doing past the beginner levels.
Power Level the Hunting Skill
I believe that leveling Hunting Skill should be done in 4 steps:
- A run through of the hunting quest line.
- Keep updated on the Hunting category of the Progression Pass.
- Hunt mobs that run from you like the Deer at Narcion if Rhinos are too difficult.
- Hunt Narcion Rhinos (Narcion Guide) with at least a +10 Professional Matchlock
Hunting Wolves by Port Epheria
The Wolf rotation below isn’t really recommended anymore since the Narcion grinding spot is the best location for hunters.
But you may be interested in them if you get bored at Narcion, so I’ll leave the info below.
Giant Wolves are kind of tough creatures, which is why you want at least a Skilled Matchlock to kill them. Make sure it’s upgraded to at least +7 (mine was +8) when you fight them.

The location of the wolves is just north of Epheria.
- Run from Epheria to entry point A on your horse
- Kill wolf 1 > 2 > 3 > 4 > 5
- Climb the rock wall to get to the higher ground
- Kill wolf 6
- If your gun has sufficient durability for another FULL rotation, descend the mountain and repeat steps 2 through 4
- If your gun doesn’t have enough durability for another full rotation, run west to exit point B, whistle your horse, and path to the repairman in Epheria.
- Repeat steps 1-6
There are a few important things to note about these instructions
- Points A and B on the map might be slightly off but it gets the general idea across
- The rock wall should be easily climbed. You have to figure out the right path to get up it — but once you do it should only take a few seconds to get up
- Never start another rotation if your gun doesn’t have enough durability to do another full rotation. If you do half a rotation, repair your gun, and then come back, you will completely mess up the timing of the wolf spawns which will kind of mess up your Hunting Skill xp
- If you are constantly finishing a rotation with like 10-15 durability (not enough for another full run), try to add a few foxes into your rotation. I always finish with less than 5 durability on my gun

Like I said at the beginning of the hunting section, it is extremely important to understand the terrain as well as your prey. Let’s look at the characteristics of the wolves.
- When you’re within aggro range of the wolf it will do a howling animation
- It is still vulnerable during this animation, and you should take the opportunity to shoot it twice
- Once it’s missing a good chunk of health it will do another howling animation that calls 3 smaller wolves to come help it
- During this animation it is invincible, so don’t waste your shots on it
- The smaller wolves also give hunting xp, and have very little health, which makes them very very good
I’ve found that if you aren’t messing up anywhere, you’ll actually finish a rotation a bit faster than the respawn timer. This really messes up your xp rates because you’re forced to just stand around.
To combat this, I began adding foxes to my rotation. After analyzing it more, I actually found that adding a huge number of foxes had a significant increase in both xp/h as well as profit/h.
Here are some important notes about foxes
- Never go far out of your way to kill foxes. Adding needless travel time is an awful idea that will really mess up your xp rates, as well as add chaos to the rotation
- Unlike wolves (which remain mostly stationary), foxes like to roam a lot. You have to show an educated discernment when going after foxes, because “good” foxes could potentially roam out of range of what is efficient.
- Killing foxes that are directly between 2 wolves is the most efficient you can get. In particular, there is often a fox between wolves 2&3 as well as a fox between wolves 4&5.
- Characters with ranged auto attacks have an advantage here. Although regular attacks can’t damage foxes, they can draw their aggro. I’ve found that it is very efficient to aggro 3 foxes and then kill them together. This can be done at the 3 foxes south of wolf 1, as well as the 3 foxes east of wolf 2.
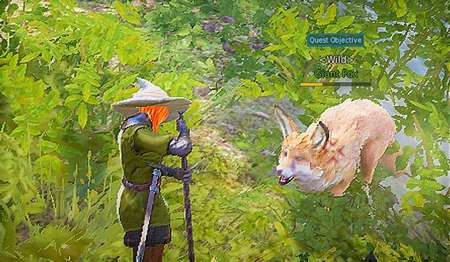
Incorporating a smart balance of foxes into your wolf rotation will take your xp and profit to the next level. It may seem like the best way to improve your xp rates is to just have a better gun, but in reality, the most important thing is making smart decisions and playing in an efficient way.
With a +10 professional musket, incorporating all of those fox kills, I can do 1 full rotation, and then do a second rotation through the 5th wolf (aka, not enough durability for the very last wolf).
Although I said not to do another rotation if you can’t do the whole thing, I have found in this specific case there is no consequence.









You can disregard rolling on most of the Odraxxia monsters. One particular way to level up fast is a technique I call “hungry hungry hippos”. Basically shoot four rhinos at once and remain crouched facing one direction. As the rhino plow through you from each direction. Shoot whatever enters your crosshairs. It may not be the best way but man its fun!
Hello 🙂 Thanks for the great tip! I will have to try that some time.
Manos Hunter’s Clothes recipe missing Dusk Laden Cotton Fabric x15
Hello 🙂 Thanks for the info. It’s corrected.
what buffs??
For example, “Sun, Moon, Stars” buffs self and party with attack, casting, and movement speed +10% for 60 seconds. It’s a bit challenging during hunting, but you can really feel the difference. Challenging because you have to swap weapons to cast it unfortunately. I hunted with a Shai once that kept casting that on our hunting party and I felt like a SUPER HUNTER! 🙂 As for Tamer, I can’t find anything similar and I can’t remember why I put her in the list. I’ll edit it out. LOL!
Probably had Tamer on there for Absorb Heilang which provides +20% Attack Speed, +20% Movement Speed, +60% Critical Rate, lasts for 60s on self and 30s on up to 4 allies. 5min 30s cd
Doh! 🙂 Thanks
Warrior has +10% attack speed too 🙁 Dont ignore him
Nice! Thanks for the tip.
Gathering Item Drop Rate affects Hunting. Both as Buff and from the Tools. This is outdated on this guide.
Also Gathering Mastery effects the chance of spending energy.
I will have to revisit this again soon to verify. Thanks for the heads up.
Ty for all your guides & tips GGC! Quick suggestion re rotations and durability, if you have a +10 Artisan ML for example, then for an easy backup take along the +10 Professional ML (which should have been kept, not sold, for training up alts). Doesn’t matter if not +10 whatever… same principle for backup, take your best & second best. I suppose branding is also an option but I haven’t on my +10 Arti ML (my best), and it would have to be +10 whatever to justify branding ML’s below Manos level I think. 🙂
Hello 🙂 That’s really helpful if you don’t have a tent yet. I waited for a sale to buy mine. 😛 The branding stone helps a bunch also!